Introduction
Learn how to add a return portal link to your Shopify store navigation menu for easy customer access.
Access this feature
Navigate to /customization/returnPreview in your application.
Step 1: In the Returndotai Returns app, go to Return Page tab in the left-hand menu. Copy your return portal link
Copy Return Portal Link
Access your unique return portal URL from the Returndotai dashboard.
- 1Log in to your Returndotai Returns account
- 2Navigate to the Return Page tab in the left-hand menu
- 3Copy the provided return portal link
Step 2: Add a Return Portal Link to Your Store with Returndotai Returns Domain
Access Shopify Menu Settings
Navigate to your Shopify admin to add the return portal link to your store menu.
- 1In the Shopify Admin Dashboard, navigate to Content and select Menus
- 2Choose the menu where you want to add the return portal link (e.g., Main Menu or Footer Menu)
- 3Click Add Menu Item
Add the Menu Item
Create a new menu item for your return portal.
- 1Enter a name for the menu item (e.g., "Return Portal")
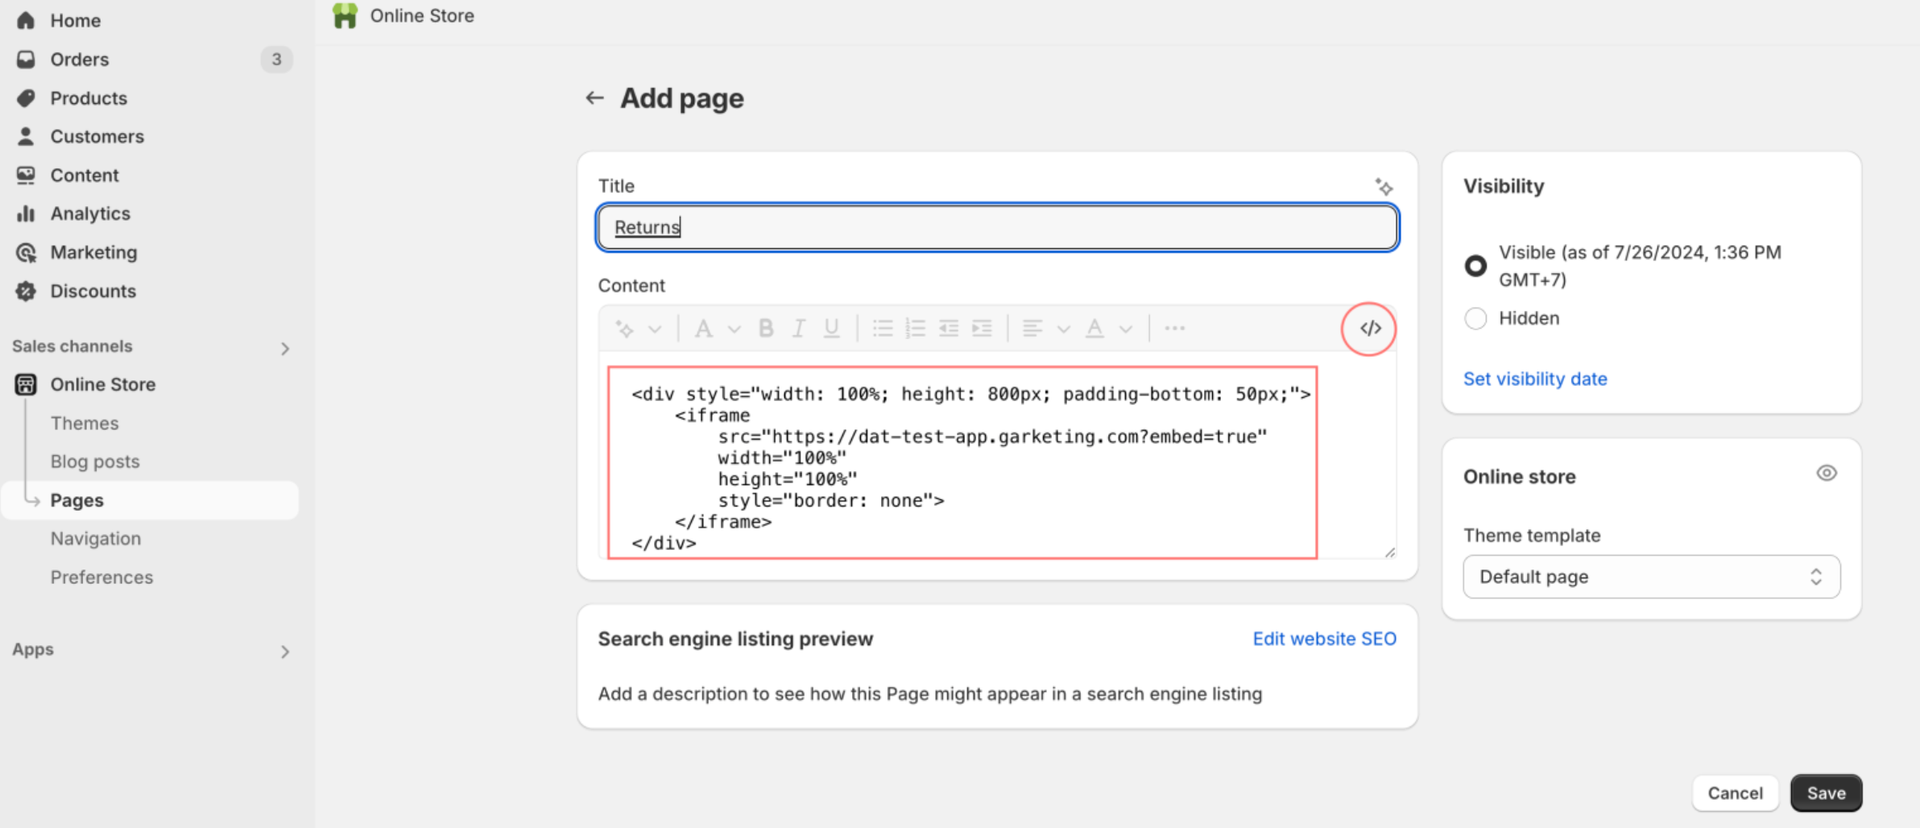
- 2In the Link field, enter the domain URL provided to you by Returndotai Returns
- 3Example: https://yourstore.returnsdrive.com (external website) or https://yourstore/apps/returns-portal (embed page in your store)
- 4Understand more about difference of both URL, please find more in How to Customize Return page URL by Shopify app proxy?
- 5Click Add and then Save Menu
Let's find out more about adding a return portal link to store
Definition
Adding a link involves creating a hyperlink that directs users to an external page or resource.
Process
Understanding how adding a link works.
- 1Link URL: You add the URL of the external page (like a Returndotai Returns domain) to your Shopify menu or page
- 2Display: Users need to click the link to be redirected to the external content
- 3User Experience: This takes users away from your store to the linked external page, which may be hosted on a different domain
- 4Example Use Case: Adding a "Return Portal" link in your store's navigation menu that directs users to a returns management page hosted on a Returndotai Returns domain
What is the difference between adding link and embedding link of return page
Embedding vs. Adding a Link
Understanding the key differences between embedding and adding a link.
| Aspect | Embedding | Adding a Link |
|---|---|---|
| Display | Content appears directly on your store's page | Users are redirected to an external page |
| User Experience | Seamless integration within your store | Users leave your store to access the external content |
| Implementation | Requires embedding HTML code into your Shopify page | Requires adding a hyperlink URL in the navigation menu |
| Example | An embedded returns form on your Shopify page | A navigation link to a return portal hosted on another domain |
Key Features
Quick Setup
Simple 2-step process to add return portal link to your store menu
Easy Access
Customers can access the return portal directly from your navigation menu
No Coding Required
Simple point-and-click process accessible to all skill levels
Important Notes
Use Clear Menu Names
Choose customer-friendly labels like "Return Portal" or "Returns" that clearly indicate the purpose of the link.
Test the Link
After adding the link, test it on your storefront to ensure it directs to the correct return portal page.
Related Articles
Comment Block in Timeline
Add comments, notes, and documentation directly to return request timelines
How to Customize Return Page URL by Shopify App Proxy
Set up custom URLs for your return portal using Shopify app proxy integration
Auto-sync with brand color
Automatically synchronize your store theme colors with the return portal
Support A Record (White-label domain)
Configure custom domains for your return portal using A record DNS settings