Introduction
Master the email notifications system to keep customers informed throughout the return and exchange process. This comprehensive guide covers sender email verification, notification template configuration, customization options, and the complete variables system. Learn how to set up, customize, and send professional automated emails that enhance customer experience and reduce support inquiries.
Access this feature
Navigate to /customization/notifications in your application.
Overview
What are Email Notifications?
Email notifications are automated messages sent to customers at key points in the return and exchange process. They keep customers informed about their request status, provide important information like shipping labels and tracking links, and deliver refund confirmations.
Types of Notifications
Return Request Notifications - Received, Approved, Resolved, Rejected
- Exchange Request Notifications - Received, Approved, Rejected, Shipped, Received Item, Resolved
- Refund Resolution Notifications - Discount Code, Bank Transfer, Original Payment, Store Credit, Gift Card
- Label Notifications - Pre-paid label approval and download links
Benefits of Email Notifications
Keep customers informed automatically without manual emails
- Reduce "Where's my refund?" support inquiries
- Professional branded communication
- Provide tracking and label information instantly
- Build customer confidence with timely updates
- Customizable templates to match your brand voice
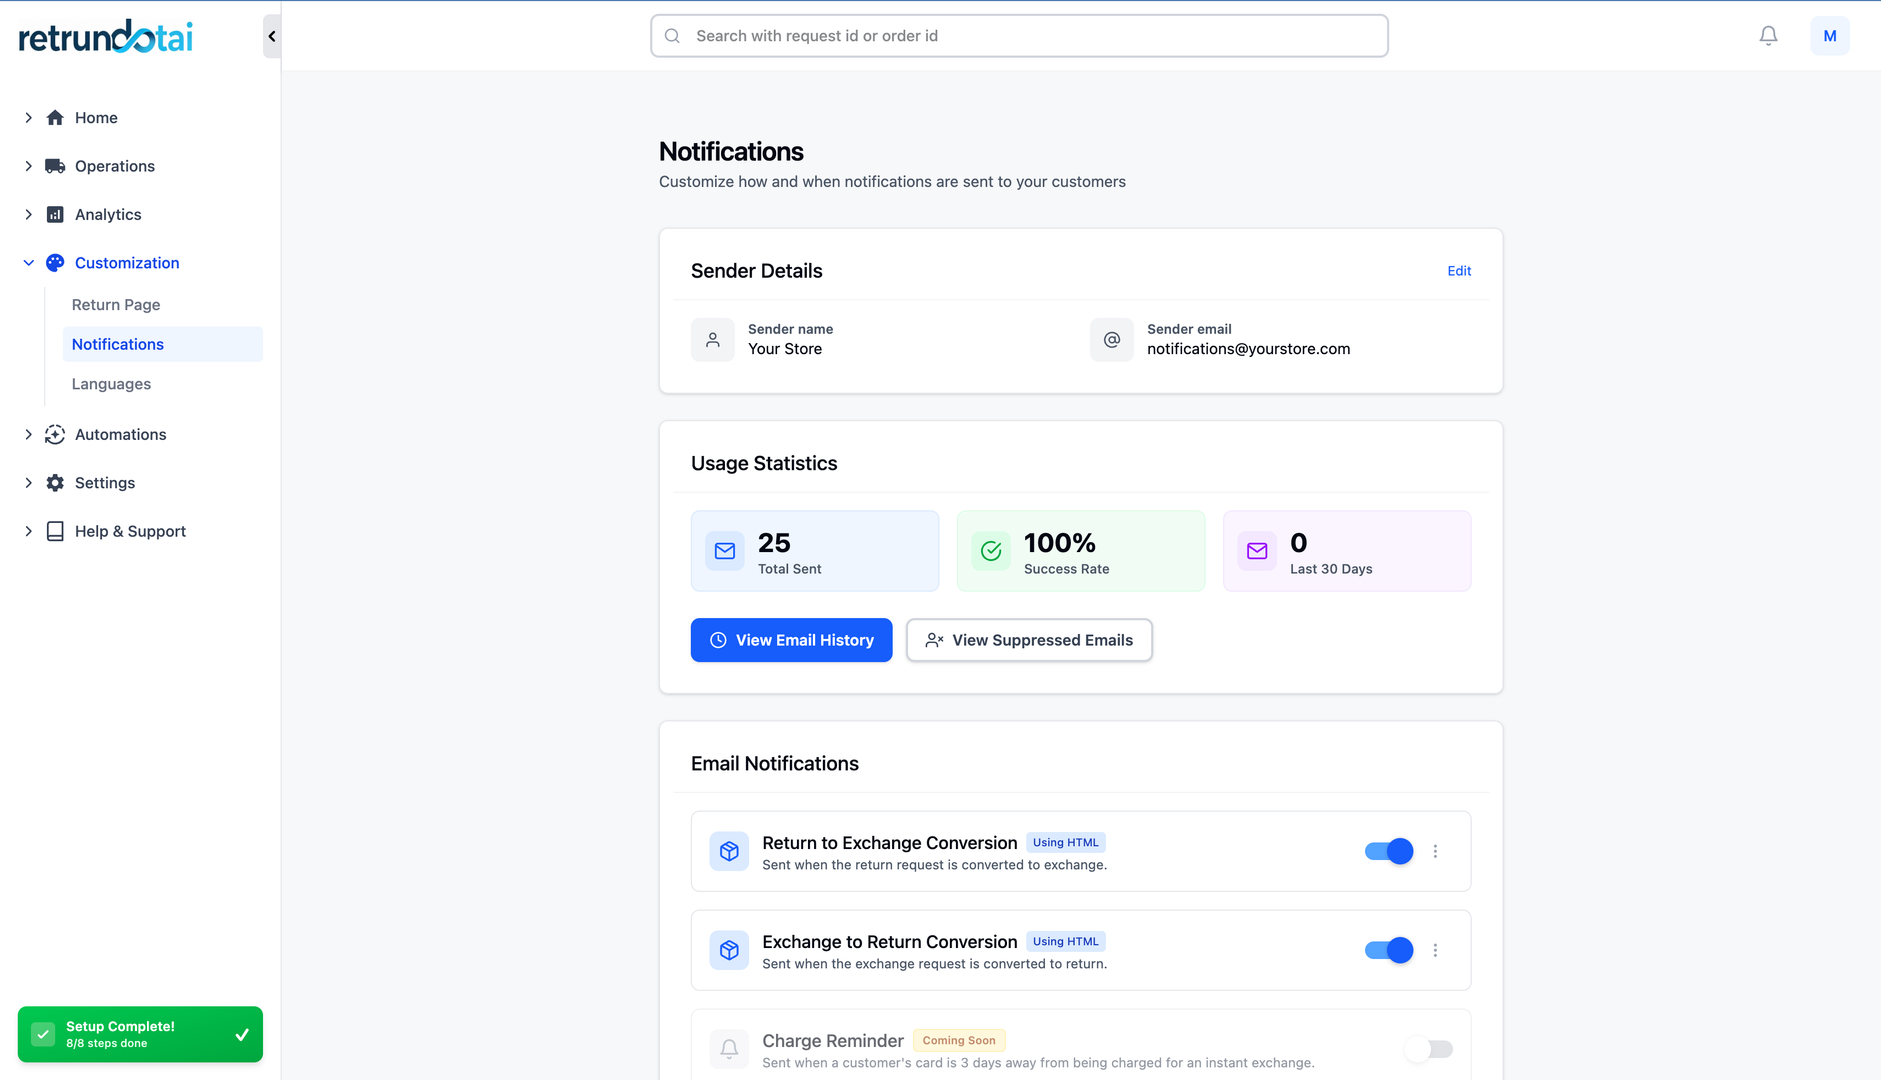
Sender Configuration (Customization > Notifications > Sender Details)
Sender Email Setup
Configure your sender email address and details for notification sending.
- 1Navigate to Customization → Notifications in your Returndotai dashboard
- 2Locate the "Sender Details" card on the page
- 3Click the "Edit" button to open the sender information modal
- 4In the modal, fill in the following fields:
- 5Sender Name - Your store or business name (e.g., "Fashion Boutique")
- 6Sender Email - Email address for sending notifications (e.g., returns@yourstore.com)
- 7Logo (optional) - Upload your store logo for email branding
- 8Click "Save" to update your sender information
- 9The system will update your sender details and refresh the display
- 10Your sender information is now configured and ready to use
Sender Details Fields
Understanding each field in the sender configuration:
- Sender Name:
- The name that appears in customer email clients
- Should be your store or brand name
- Example: "Fashion Boutique Returns"
- Sender Email:
- The email address customers see as the sender
- Should be a professional, branded email
- Example: returns@yourstore.com or support@yourstore.com
- Avoid using personal email addresses
- Logo (optional):
- Your store logo that appears in email templates
- Recommended size: 200x200px or larger
- Supports PNG, JPG, and SVG formats
- Helps with brand recognition and professionalism
Best Practices for Sender Configuration
✓ Use a professional, branded email address (returns@yourstore.com, not personal@gmail.com)
- ✓ Choose an email you actively monitor for potential customer replies
- ✓ Keep sender name consistent across all email templates
- ✓ Upload a clear, recognizable logo for better brand recognition
- ✓ Use a dedicated returns email separate from general customer service
- ✓ Ensure the sender email matches your domain for better deliverability
Merchant Notifications (Receive Copies)
Enable merchant notifications to receive copies of all customer communications.
- 1In the Notifications page, locate the email notification settings
- 2Toggle ON to receive copies of all emails sent to customers
- 3Toggle OFF to only send emails to customers (not to yourself)
- 4Useful for tracking communication history and monitoring customer interactions
- 5Copies are sent to your configured sender email address

Benefits of Merchant Notifications
Track all customer communications in one email inbox
- Monitor notification delivery and content
- Review email templates in real-world scenarios
- Keep team members informed of customer interactions
- Create email archive for customer service reference
Notification Templates
Email Template System
Returndotai provides pre-built email templates for every stage of the return and exchange process. Each template is fully customizable and includes dynamic variables that automatically populate with customer and order information.
Return Request Notifications
Automated emails sent at each stage of the return request process.
- 11. Return Request Received - Sent when customer submits return
- 2Key variables: {{RMA_ID}}, {{order_id}}, {{item_return_details}}
- 32. Return Request Approved - Sent upon merchant approval
- 4Include: {{shipping_instructions}}, {{label_download_link}}
- 53. Return Request Resolved - Sent when return completed
- 6Include: {{full_refund_amount}}
- 74. Return Request Rejected - Sent when return denied
- 8Include: {{reject_reason}}
- 95. "Ship with Pre-paid Label" Request Approved - For approved pre-paid label requests
- 10Include: {{label_download_link}}, {{label_tracking_link}}
Refund Resolution Notifications
Specialized emails for different refund methods, each providing specific information relevant to that refund type.
- 11. Refund to Discount Code
- 2Include: {{discount_code}}, {{discount_value}}
- 32. Refund to Online Bank Transfer
- 4Include: {{banking_info}}, {{full_refund_amount}}
- 53. Refund to Original Payment Method
- 6Include: {{full_refund_amount}}
- 74. Refund to Store Credit
- 8Include: {{full_refund_amount}}
- 95. Refund to Gift Card
- 10Include: {{gift_card_code}}, {{full_refund_amount}}
Exchange Request Notifications
Automated emails for the complete exchange workflow.
- 11. Exchange Request Received - Initial exchange submission
- 2Include: {{item_return_details}}, {{item_receive_details}}
- 32. Exchange Request Approved - Exchange approval confirmation
- 4Include: {{shipping_instructions}}
- 53. Exchange Request Rejected - Exchange denial notification
- 6Include: {{reject_reason}}
- 74. Shipped Exchanged Item - When merchant ships replacement
- 8Include: {{label_tracking_link}}
- 95. Received Return Item - Confirmation of returned item receipt
- 10Include: {{item_return_details}}
- 116. Exchange Request Resolved - Final exchange completion
- 12Include: {{full_refund_amount}} (if applicable)
Email Template Functions
Send Test Email Function
Test your email templates before activating them to ensure they look perfect and all variables populate correctly.
- 1Navigate to Settings → Notifications → Email Templates
- 2Select the template you want to test
- 3Click the "Send Test" button in the template editor
- 4Enter one or more test email addresses (separated by commas)
- 5Click "Send" to dispatch the test email
- 6All variables will be populated with sample data automatically
- 7Check your inbox to review the email appearance
- 8Verify formatting, branding, and variable population
Why Use Send Test Email?
Preview template appearance in actual email clients
- Verify all variables populate with data correctly
- Test email rendering across different email providers (Gmail, Outlook, etc.)
- Ensure branding and styling match your store
- Catch typos or formatting issues before customers see them
- Confirm mobile responsiveness
Revert to Default Function
Reset any template back to its original version, removing all customizations.
- 1Open the email template you want to reset
- 2Locate the "Revert to Default" button (usually at the top or bottom of editor)
- 3Click "Revert to Default"
- 4Confirm the action in the warning dialog
- 5Template will immediately reset to the standard version
- 6All custom text, formatting, and modifications will be removed
- 7Your branding (logo, colors) will remain unchanged
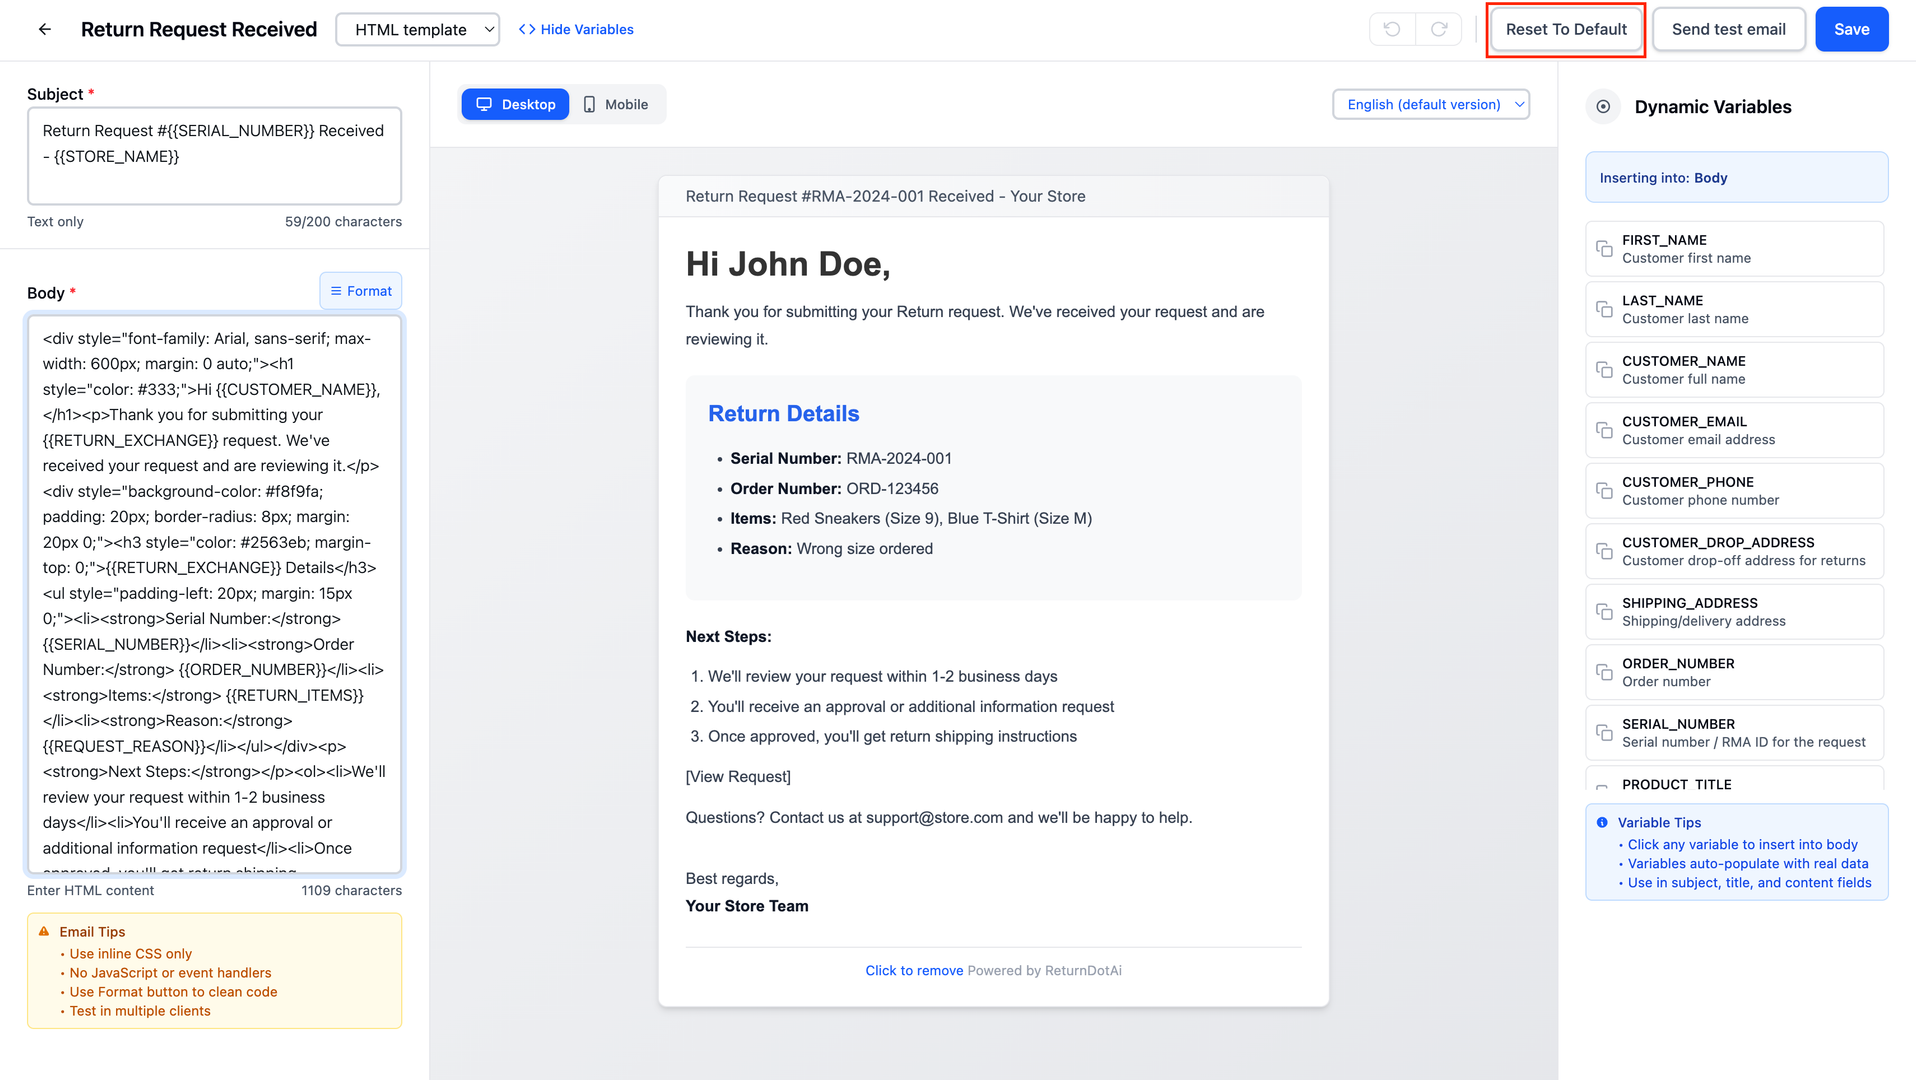
⚠️ Important: Revert to Default Warnings
❌ Action cannot be undone - there is no way to recover customizations
- 🗑️ All customizations will be permanently lost
- 📝 Default template includes standard variables and layout
- 🎨 Your store branding (logo, colors) remains unchanged
- 💡 Consider copying custom text before reverting if you want to save it
Variables System
What are Email Variables?
Email variables are dynamic placeholders that automatically populate with real customer and order data when emails are sent. Variables use double curly braces syntax like {{variable_name}} and are replaced with actual values at send time.
Order Related Variables
Variables that display information about the return/exchange request and original order.
{{RMA_ID}}Return merchandise authorization number
Example: RMA123456
Use in all return/exchange notifications for reference
{{order_id}}Shopify order ID number
Example: #12345
Link return to original order
{{item_return_details}}List of items being returned
Example: Blue Cotton T-Shirt (Size M) x1
Show what items are being returned
{{full_refund_amount}}Total refund amount
Example: $49.99
Display refund value in resolution emails
{{item_receive_details}}List of items customer will receive (exchanges)
Example: Blue Cotton T-Shirt (Size L) x1
Show exchange replacement items
Business Related Variables
Variables that display your store and business information.
{{store_name}}Your store name
Example: Fashion Boutique
Personalize emails with your store name
{{return_address}}Return shipping address
Example: 123 Main St, New York, NY 10001
Provide address for customer-arranged shipping
{{store_email}}Store contact email
Example: support@fashionboutique.com
Provide contact information for questions
Customer Related Variables
Variables that personalize emails with customer information.
{{customer_email}}Customer email address
Example: john.doe@email.com
Reference customer email in communications
{{customer_name}}Customer full name
Example: John Doe
Personalize email greeting
{{customer_address}}Customer shipping address
Example: 456 Oak Ave, Los Angeles, CA 90001
Confirm shipping/return address
Refund Resolution Variables
Variables specific to different refund methods.
{{discount_code}}Generated discount code
Example: RETURN20OFF
Provide code for discount refunds
{{discount_value}}Discount code amount
Example: $49.99 or 20%
Show discount value
{{banking_info}}Bank transfer details
Example: Account: 1234567890, Routing: 987654321
Display banking information for transfers
{{gift_card_code}}Gift card code
Example: GC-ABCD-1234-EFGH
Provide redeemable gift card code
Action Link Variables
Variables that provide clickable links for customer actions.
{{label_download_link}}Prepaid shipping label PDF URL
Example: https://app.returndotai.com/labels/abc123.pdf
Link to download printable shipping label
{{label_tracking_link}}Shipment tracking URL
Example: https://tracking.usps.com/tracking/12345
Link to track return shipment
{{view_request}}Return portal URL for this request
Example: https://yourstore.returnsdrive.com/request/RMA123456
Link to view/manage return request online
Best Practices
Sender Email Configuration
Use a professional, branded email address (returns@yourstore.com, not personal@gmail.com)
- Choose an email you actively monitor if merchant notifications are enabled
- Configure sender details immediately after setup to avoid delays when first customer returns
- Upload a high-quality logo for better brand recognition in emails
- Use a dedicated returns email separate from general customer service
- Keep sender name concise and recognizable (e.g., "YourStore Returns")
Template Customization Tips
Maintain consistent brand voice across all email templates
- Keep emails concise - customers want key information quickly
- Use bold or headings to highlight important details (refund amounts, tracking links)
- Test emails before activating to catch formatting issues
- Include clear next steps or calls to action in each email
- Ensure all required variables are present for each email type
Variable Usage Guidelines
Always include {{RMA_ID}} for customer reference
- Use {{customer_name}} to personalize greetings
- Include {{view_request}} link so customers can check status online
- Add {{store_email}} for customers who have questions
- Test variables with "Send Test" to ensure they populate correctly
- Don't remove default variables - they provide essential information
Email Testing Strategy
Send test emails to multiple email providers (Gmail, Outlook, Yahoo)
- Check mobile and desktop rendering
- Verify all links are clickable and lead to correct destinations
- Confirm variables show sample data (not empty brackets)
- Test with merchant notifications ON and OFF
- Review spam score using email testing tools
Notification Timing
Emails are sent automatically when status changes occur
- Return Request Received: Immediate upon customer submission
- Approved/Rejected: When merchant takes action
- Resolved: When refund is processed
- Ensure timely merchant actions to keep customers informed
Troubleshooting
Common Email Notification Issues
Key points to understand:
- Issue: Cannot send notifications → Solution: Check that sender email is configured in Customization → Notifications → Sender Details.
- Issue: Sender details not saving → Solution: Ensure all required fields (Sender Name and Sender Email) are filled. Check for validation errors.
- Issue: Test email shows empty variables → Solution: This is expected - test emails use {{variable}} placeholders. Real emails will populate with actual data.
- Issue: Customer didn't receive email → Solution: Check customer's spam folder. Verify email address is correct in their profile. Ensure sender email is properly configured.
- Issue: Emails going to spam → Solution: Use a professional domain email (not free email providers). Consider setting up SPF/DKIM records with your email provider.
- Issue: Template changes not appearing → Solution: Click "Save" after editing. Clear browser cache. Send new test email.
- Issue: Lost customizations accidentally → Solution: If you clicked "Revert to Default", customizations cannot be recovered. Re-customize the template.
- Issue: Logo not showing in emails → Solution: Ensure logo is uploaded in Sender Details. Check that image URL is accessible. Try re-uploading the logo.
Email Delivery Problems
If customers report not receiving emails: 1) Check that sender email is configured in Sender Details, 2) Ask customer to check spam/junk folder and mark as "Not Spam", 3) Verify customer email address is correct, 4) Check merchant notifications to see if emails are being sent, 5) Contact Returndotai support if issues persist.
Getting Help
For issues not covered in troubleshooting, contact Returndotai support via live chat in the dashboard or email support@returndotai.com. Provide details about: which email template, error messages, screenshots of sender configuration, and when the issue started.
Key Features
Automated Email System
Sends professional emails automatically at every stage of return and exchange process
Customizable Sender Details
Configure sender name, email, and logo to match your brand identity
Comprehensive Templates
15+ pre-built email templates for returns, exchanges, and refund resolutions
Dynamic Variables
25+ variables automatically populate with customer, order, and business data
Template Customization
Fully customizable templates to match your brand voice and style
Send Test Function
Preview emails with sample data before activating templates
Merchant Notifications
Receive copies of all customer emails for tracking and monitoring
Revert to Default
Easily reset templates to original version if needed
Important Notes
Configure Sender Details First
Navigate to Customization → Notifications → Sender Details to set up your sender name, email, and logo before sending notifications.
Use Professional Email
Set up a branded sender email like returns@yourstore.com instead of personal email addresses for better deliverability and professionalism.
Upload Your Logo
Add your store logo in Sender Details to make emails look more professional and increase brand recognition.
Test All Templates
Use the "Send Test" function to preview every template before customers receive them. Test on multiple email providers.
Don't Remove Default Variables
Keep default variables like {{RMA_ID}}, {{order_id}}, and {{customer_name}} - they provide essential information customers need.
Revert to Default is Permanent
The "Revert to Default" action cannot be undone. Copy any custom text you want to keep before reverting.
Enable Merchant Notifications
Turn on merchant notifications to track all customer communications and create an email archive for your team.
Include Action Links
Always include {{view_request}} link so customers can check their return status online anytime.
Related Articles
Comment Block in Timeline
Add comments, notes, and documentation directly to return request timelines
How to Customize Return Page URL by Shopify App Proxy
Set up custom URLs for your return portal using Shopify app proxy integration
Auto-sync with brand color
Automatically synchronize your store theme colors with the return portal
Support A Record (White-label domain)
Configure custom domains for your return portal using A record DNS settings