Introduction
This feature allows merchants to manually create and manage return and exchange requests directly from their dashboard, streamlining the process for both merchants and customers. Whether handling phone orders, special cases, or providing concierge service, you can initiate returns and exchanges on behalf of your customers.
Access this feature
Navigate to /returns in your application.
Accessing the Feature
How to Access Manual Creation
The manual creation feature is easily accessible from your Returndotai admin dashboard.
- 1Log in to your merchant dashboard
- 2Navigate to the Management tab
- 3Look for and click on "Create Return/Exchange Request"
- 4The creation interface will open

Creating a Return Request
Step 1: Search for the Order
Begin by locating the customer's order using one of several search methods. The system provides intelligent search suggestions as you type.
- 1In the search bar at the top of the page, enter either:
- 2Order number, or
- 3Customer's email address
- 4Phone number
- 5As you type, suggestions will appear
- 6You can select one of these suggestions or complete your entry
- 7Press Enter or click the search button
- 8The order details will load
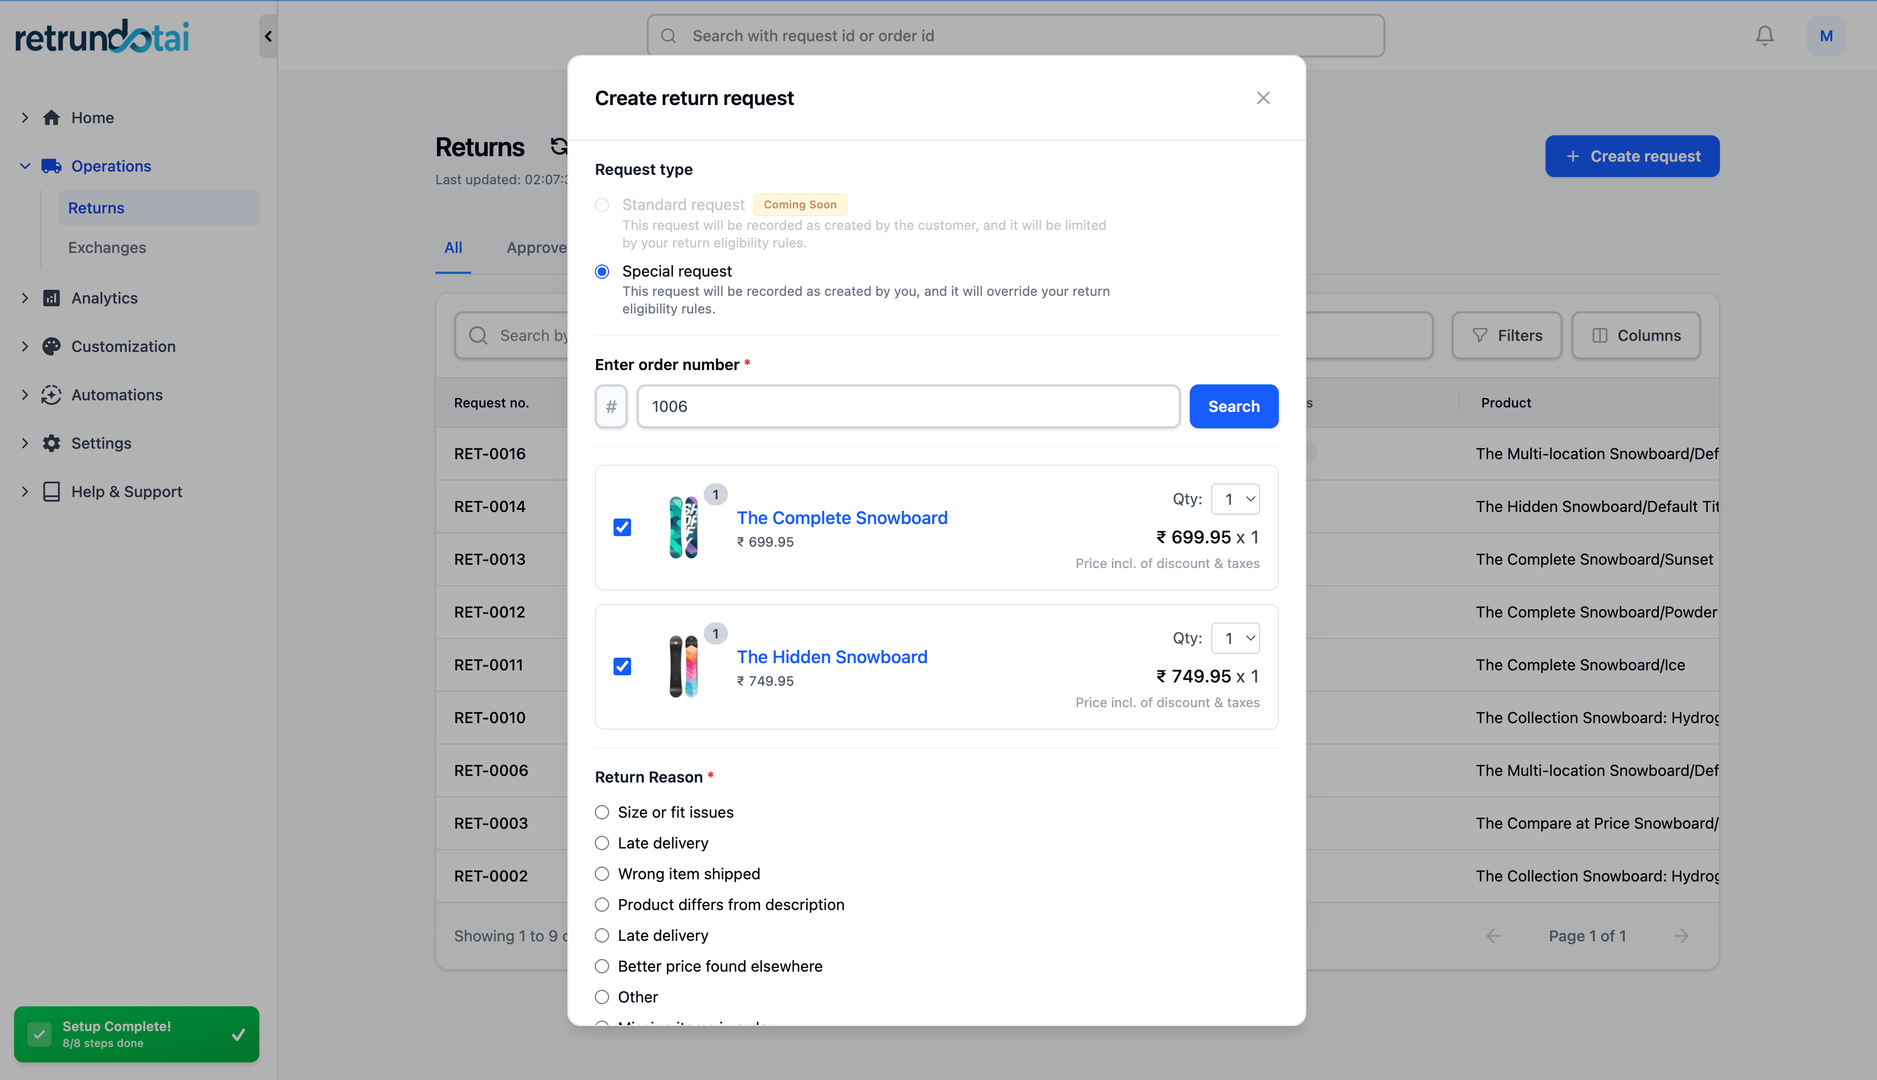
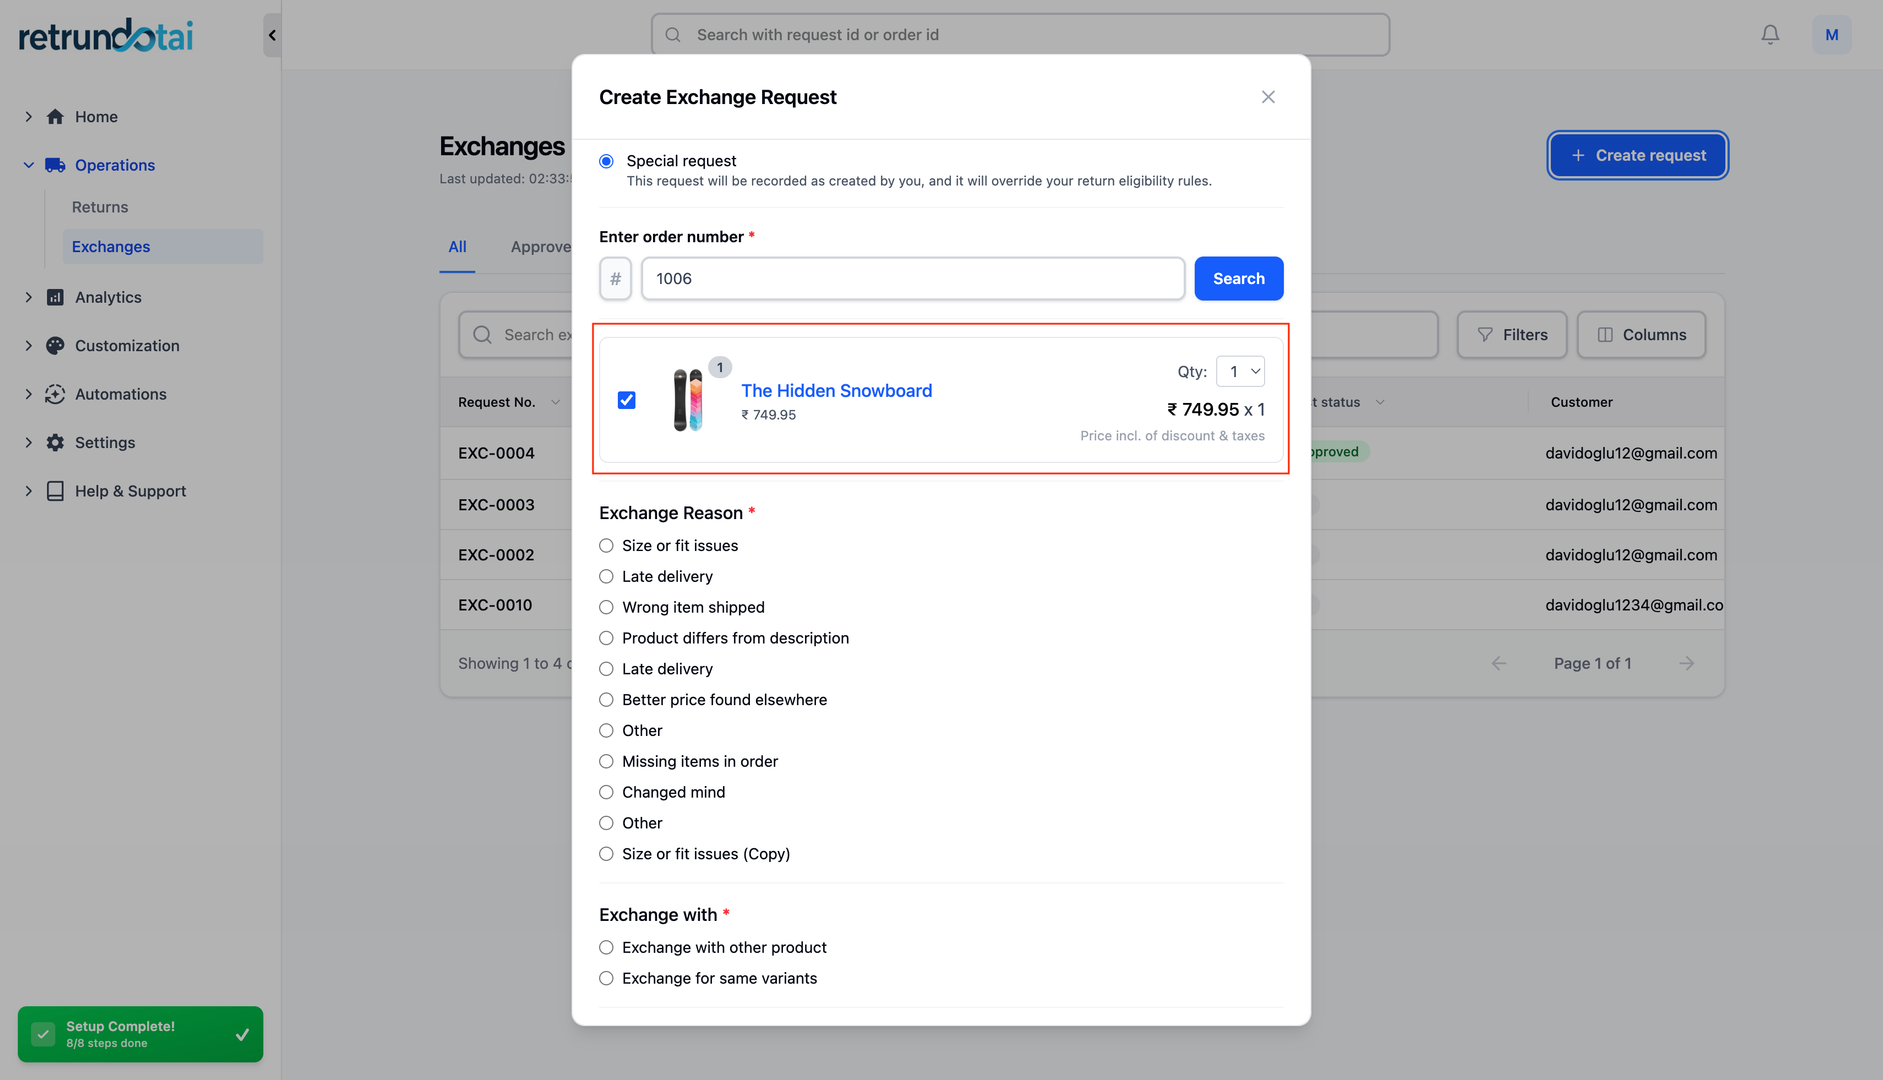
Step 2: Select Items for Return
You'll see a list of products from the order. Each row displays product information to help you select the correct items for return.
- 1Review the product list showing:
- 2Product name
- 3Price
- 4Quantity available for return
- 5Reason field (if applicable)
- 6For each item to be returned:
- 7Enter the quantity in the "Quantity" field
- 8The row will be highlighted when quantity > 0 is entered
- 9Add multiple items if needed
- 10Verify selections before proceeding
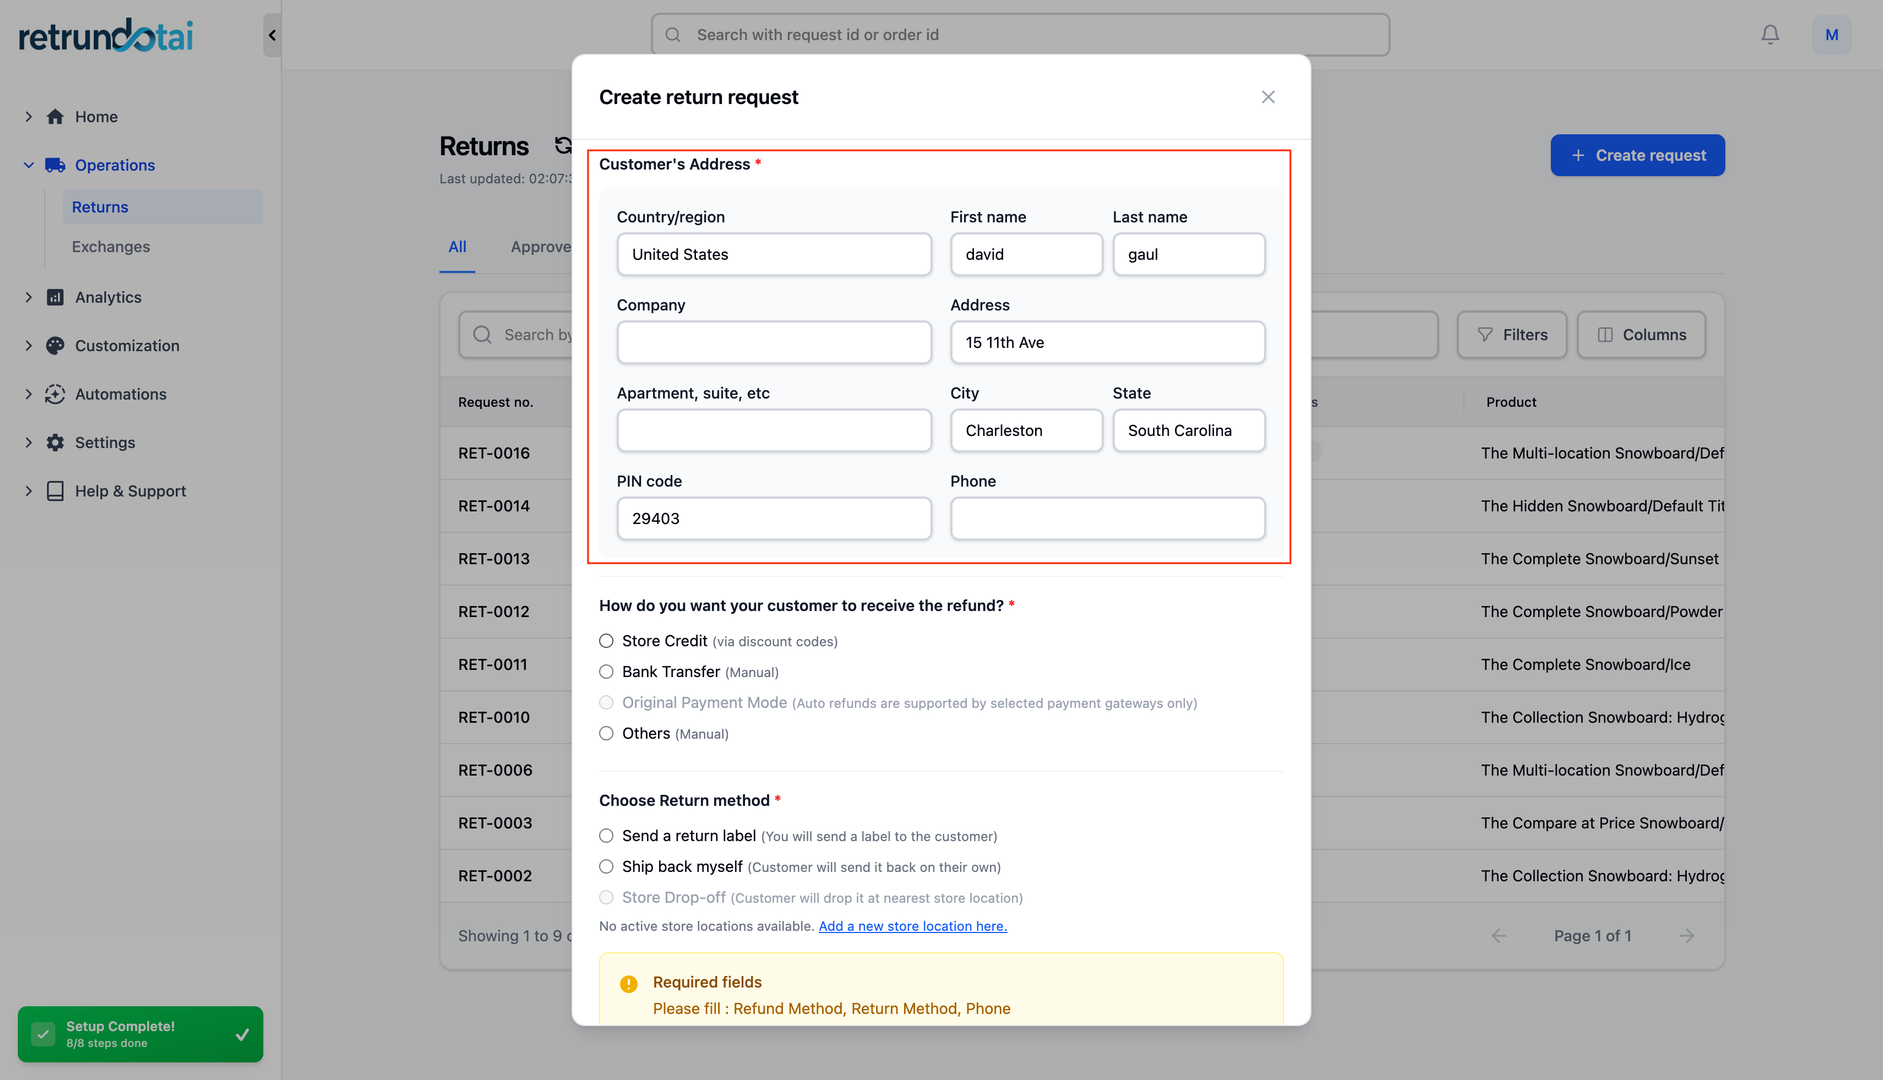
Step 3: Choose Return Method and Resolution
Configure how the customer will receive their refund and how the return will be processed. Available options may vary based on your plan and settings.
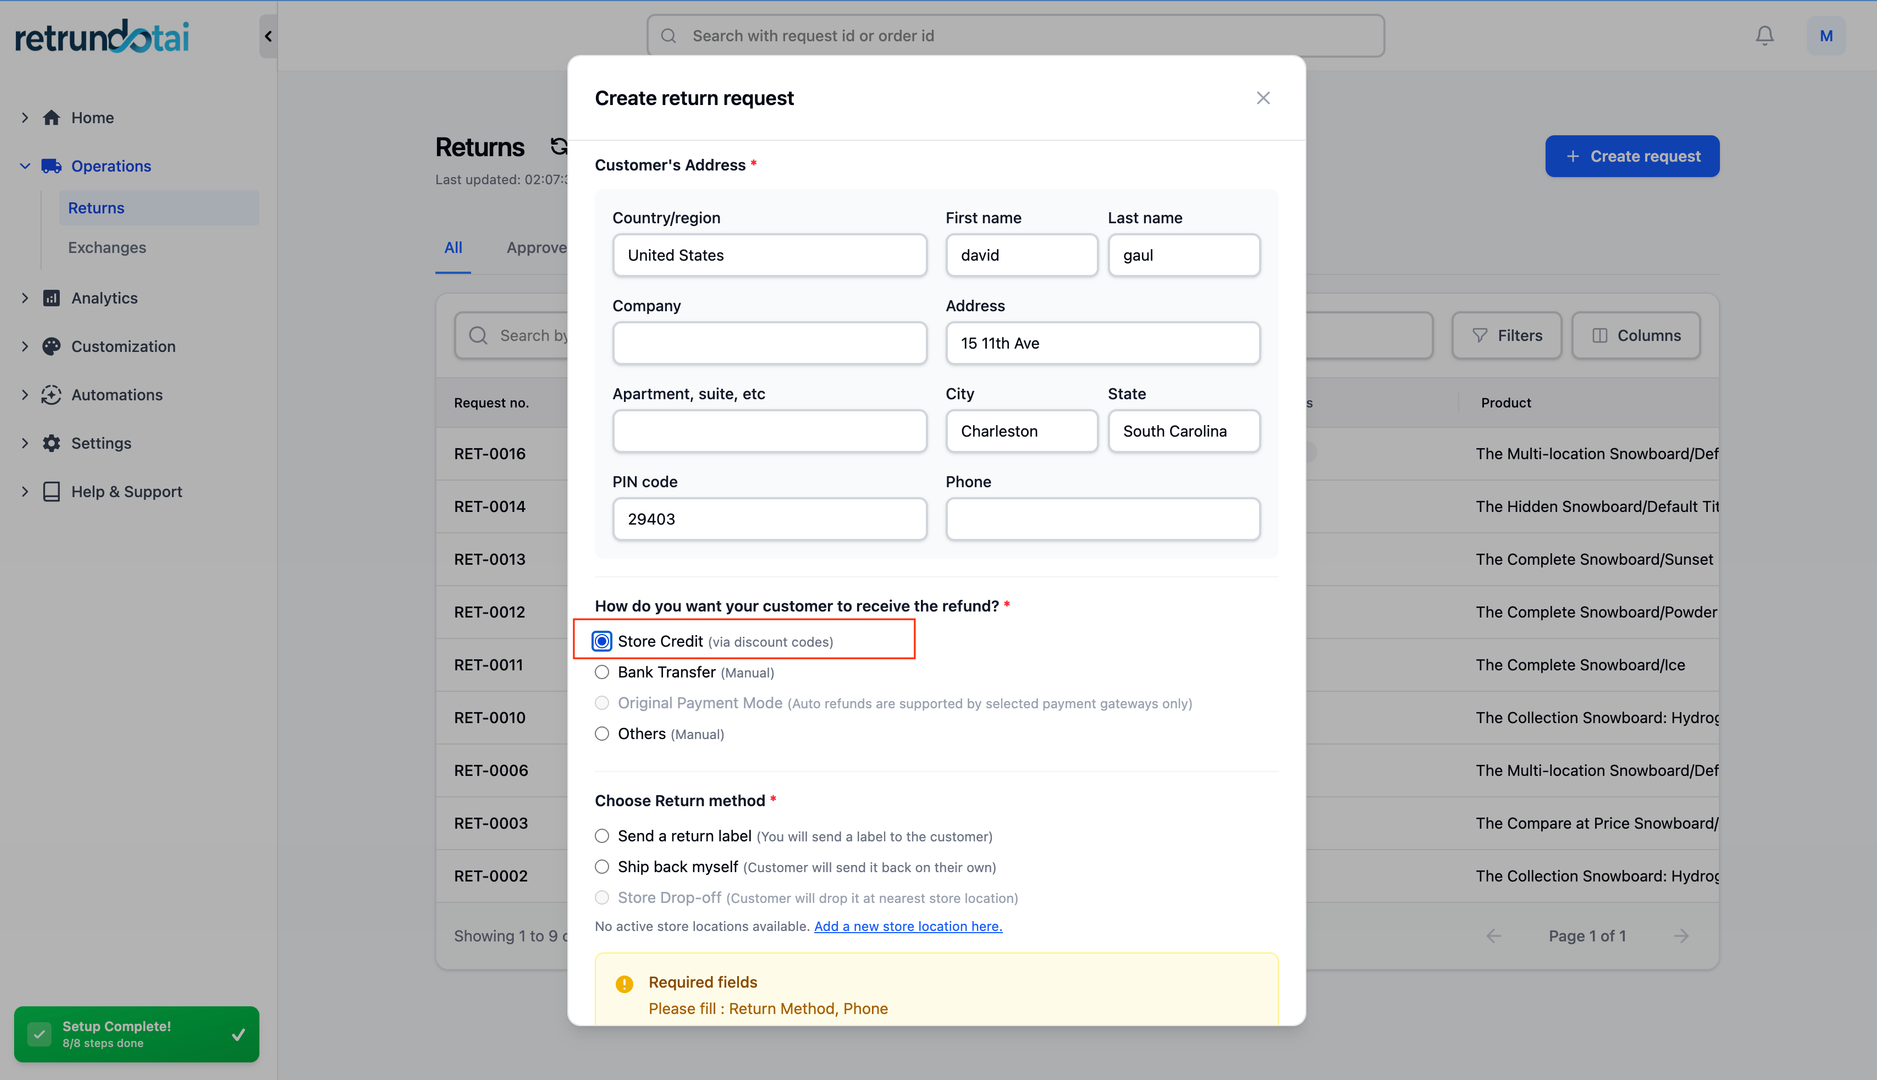
- 1Under "Refund Method," select one of the following:
- 2Refund to Original Payment Method
- 3Store Credit
- 4Gift Card
- 5Exchange
- 6Note: Some options may be unavailable depending on your plan
- 7
- 8Under "Resolution," choose how the return will be processed:
- 9Ship with any carrier
- 10Print a label
- 11Refund without return
- 12Exchange
- 13Note: Some options may require a plan upgrade
Step 4: Add Notes (Optional)
If needed, add any additional information or instructions in the "Note" field. This can include special handling instructions, customer requests, or internal notes for your team.
- 1Scroll to the "Note" field
- 2Enter any relevant information:
- 3Special handling instructions
- 4Customer requests or preferences
- 5Internal notes for your team
- 6Reason for manual creation
- 7Notes are visible in the return request details
- 8Click outside the field to save
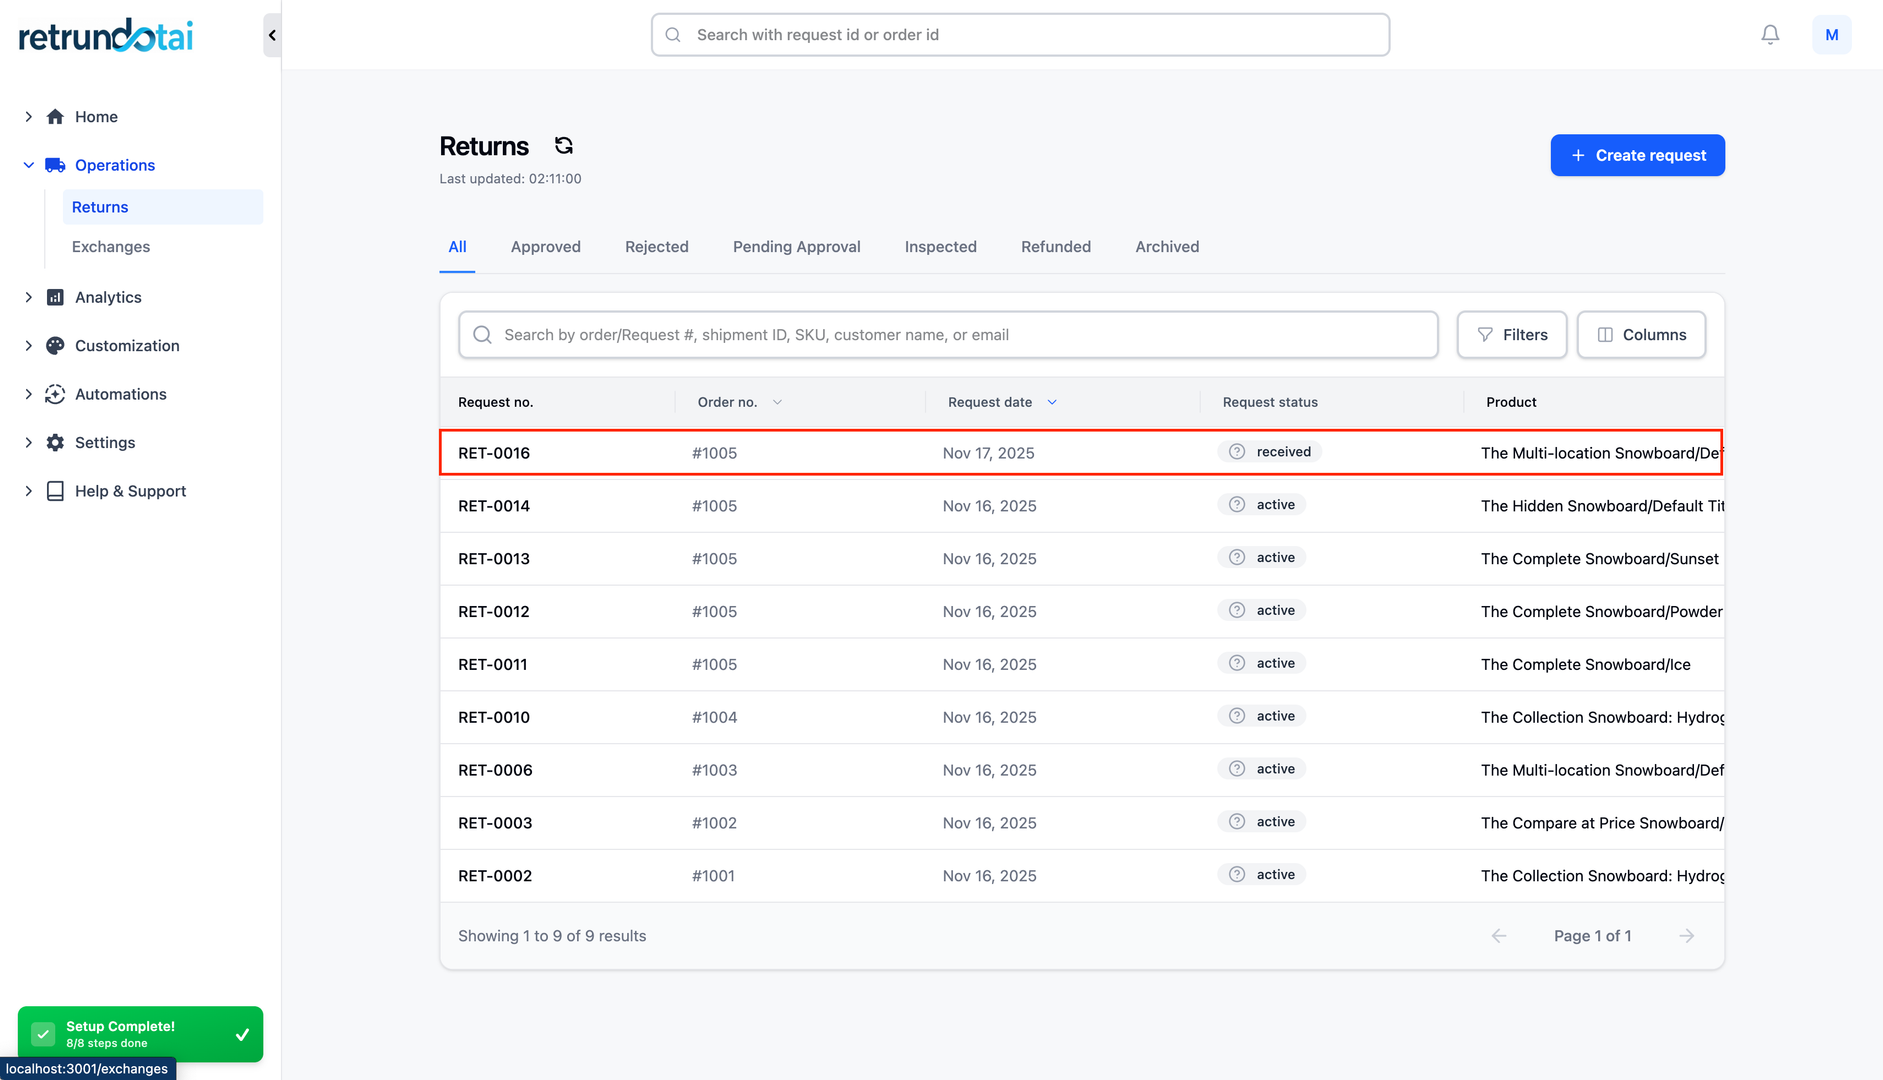
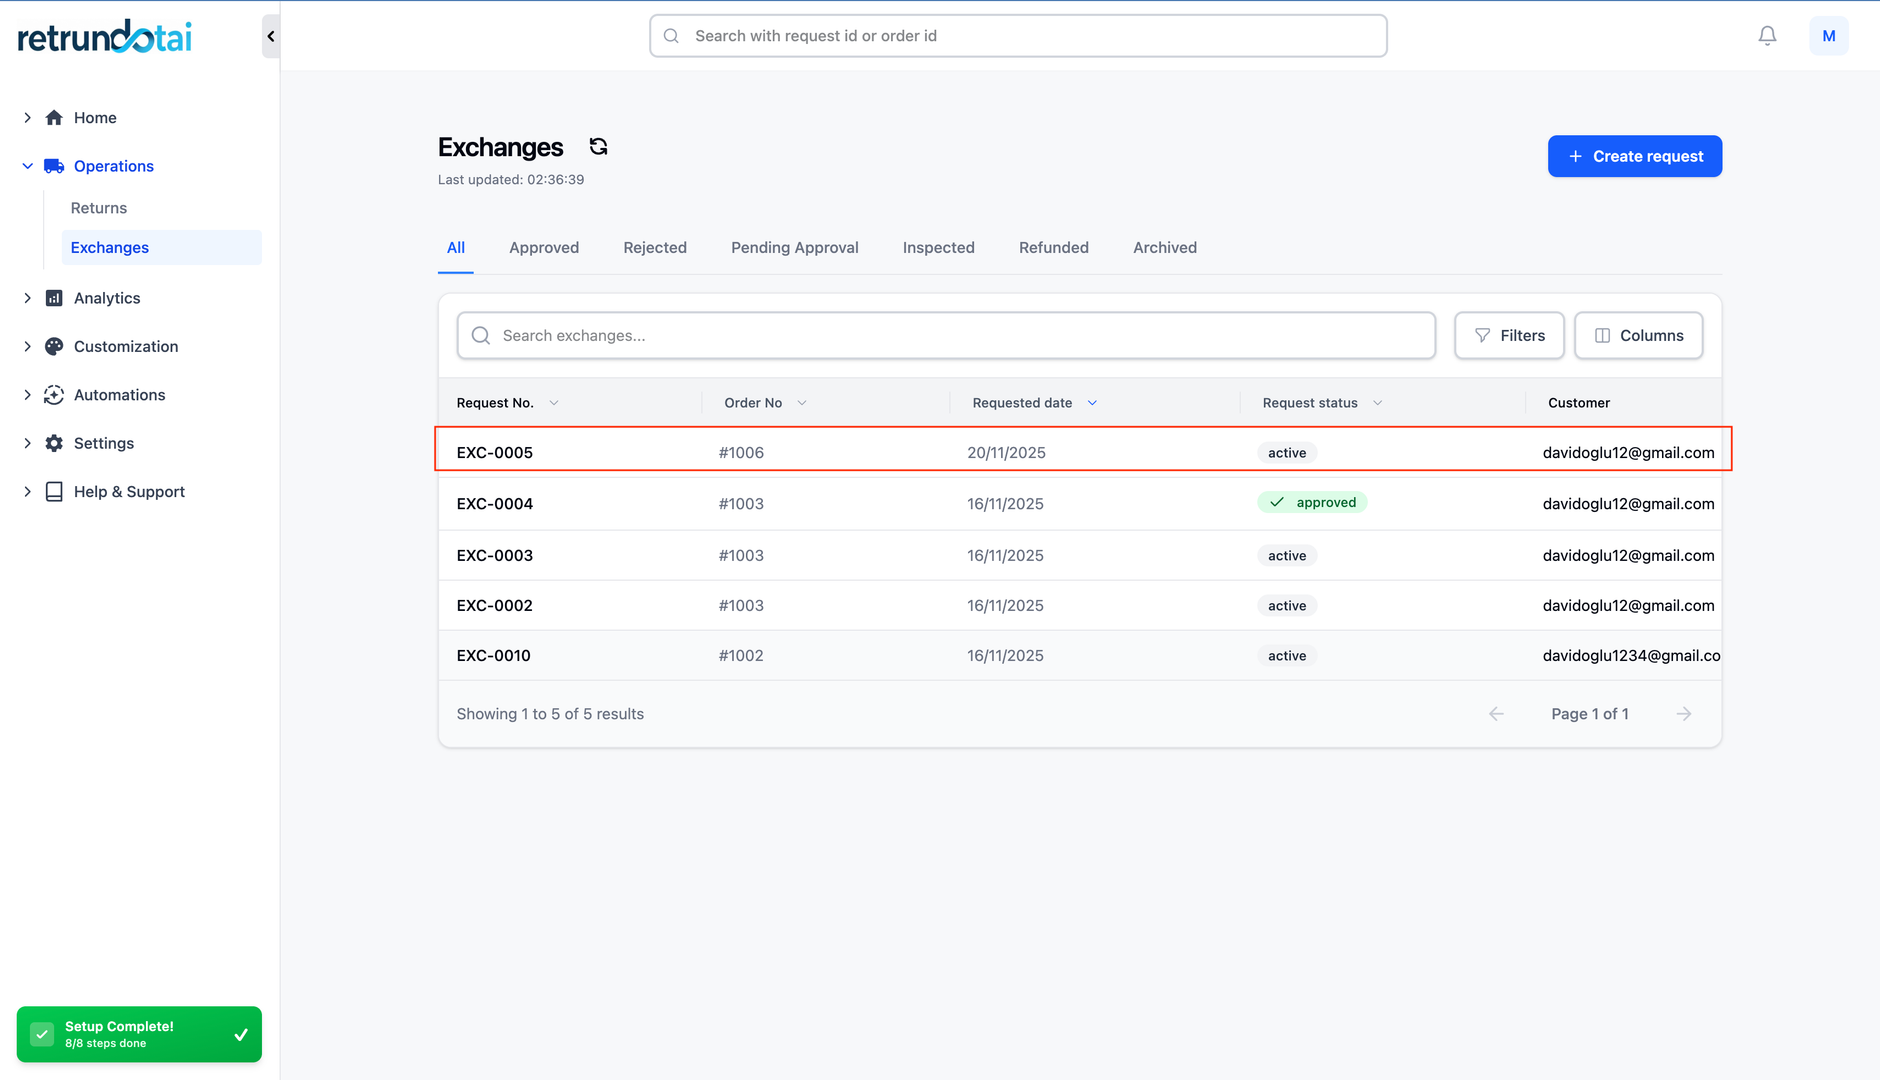
Step 5: Submit the Return Request
Before submitting, carefully review all entered information to ensure accuracy. Once submitted, the return request will be created with "pending approval" status.
- 1Review all entered information for accuracy:
- 2Order details
- 3Selected items and quantities
- 4Refund method
- 5Resolution type
- 6Notes (if added)
- 7Click "Create Return" at the bottom of the summary section
- 8The request will be created and set to "pending approval" status
- 9You'll be redirected to the request details page
Creating an Exchange Request
Steps 1-2: Search and Select Items
Follow the same process as for returns to search for the order and select items that the customer wants to exchange.
- 1Follow the same process as for returns:
- 2Search for the order (by order number, email, or phone)
- 3Select items from the order
- 4Enter quantities for items to be exchanged
- 5Proceed to add exchange items
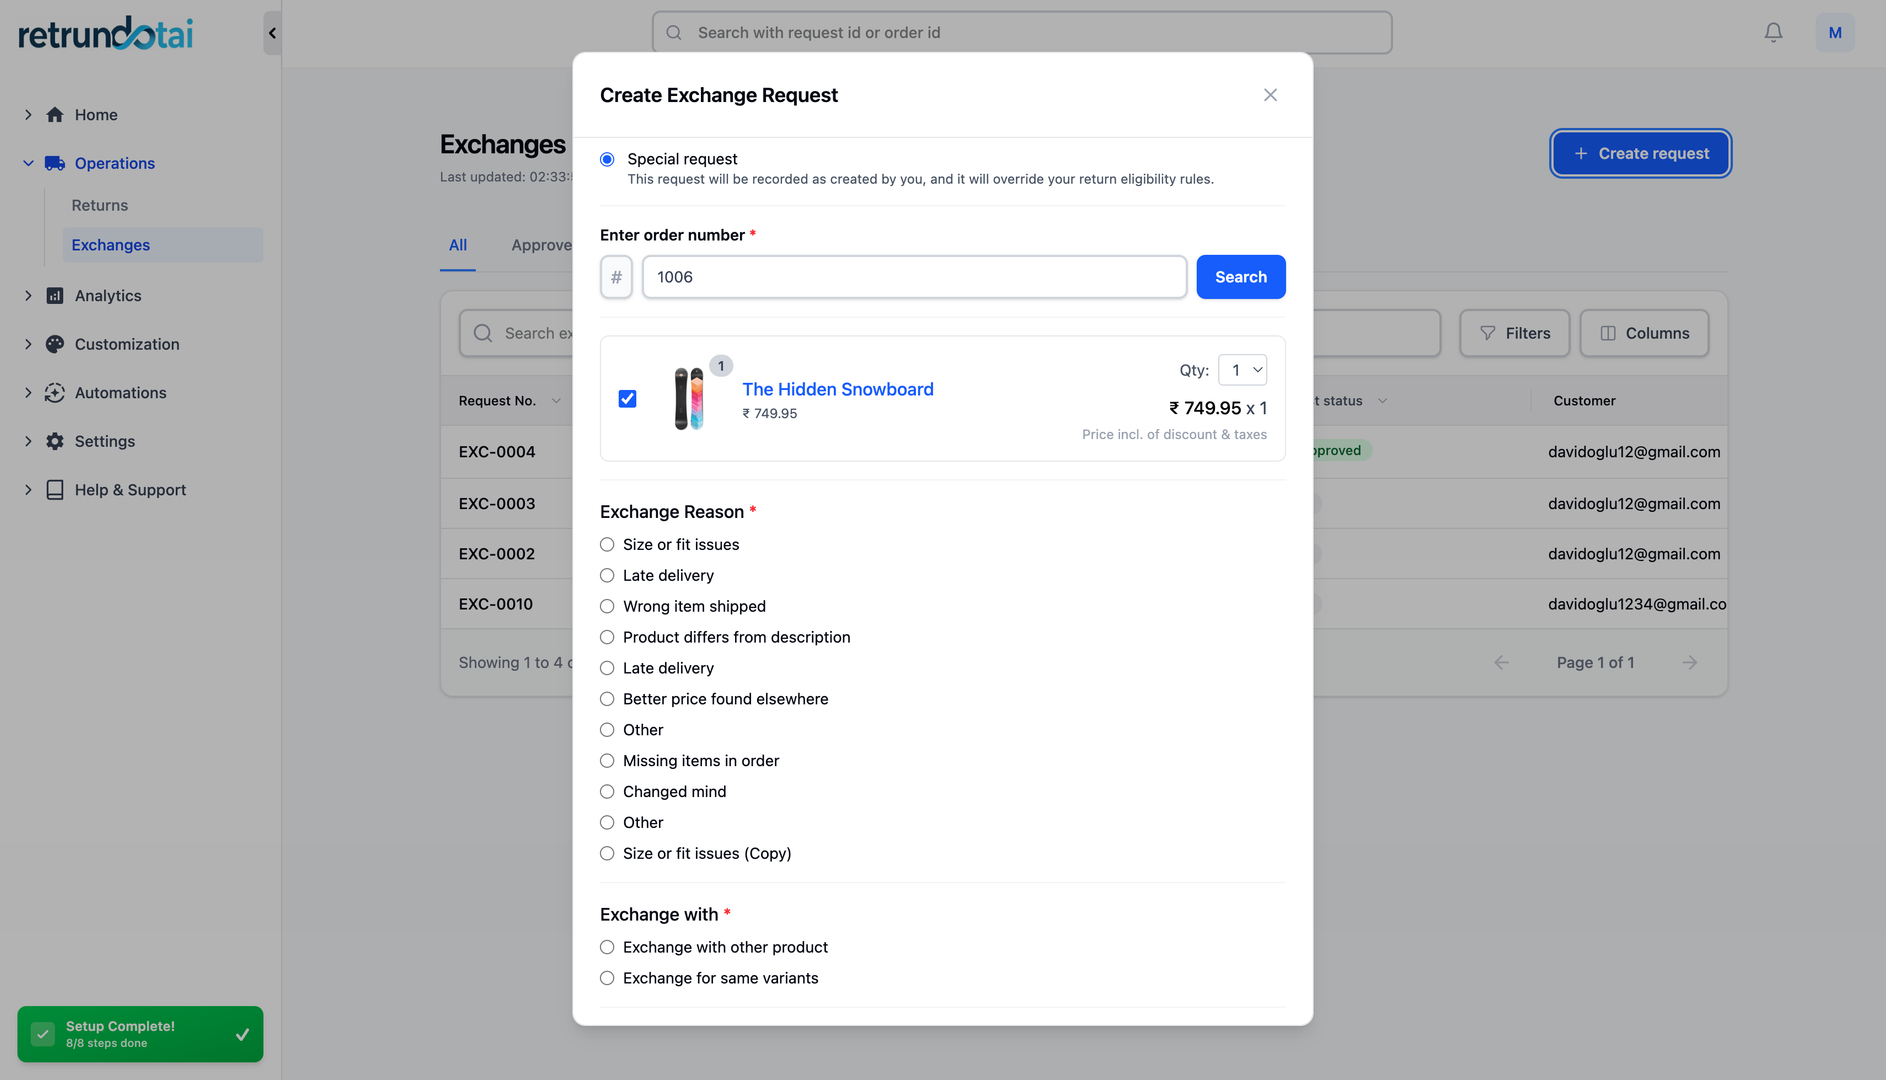
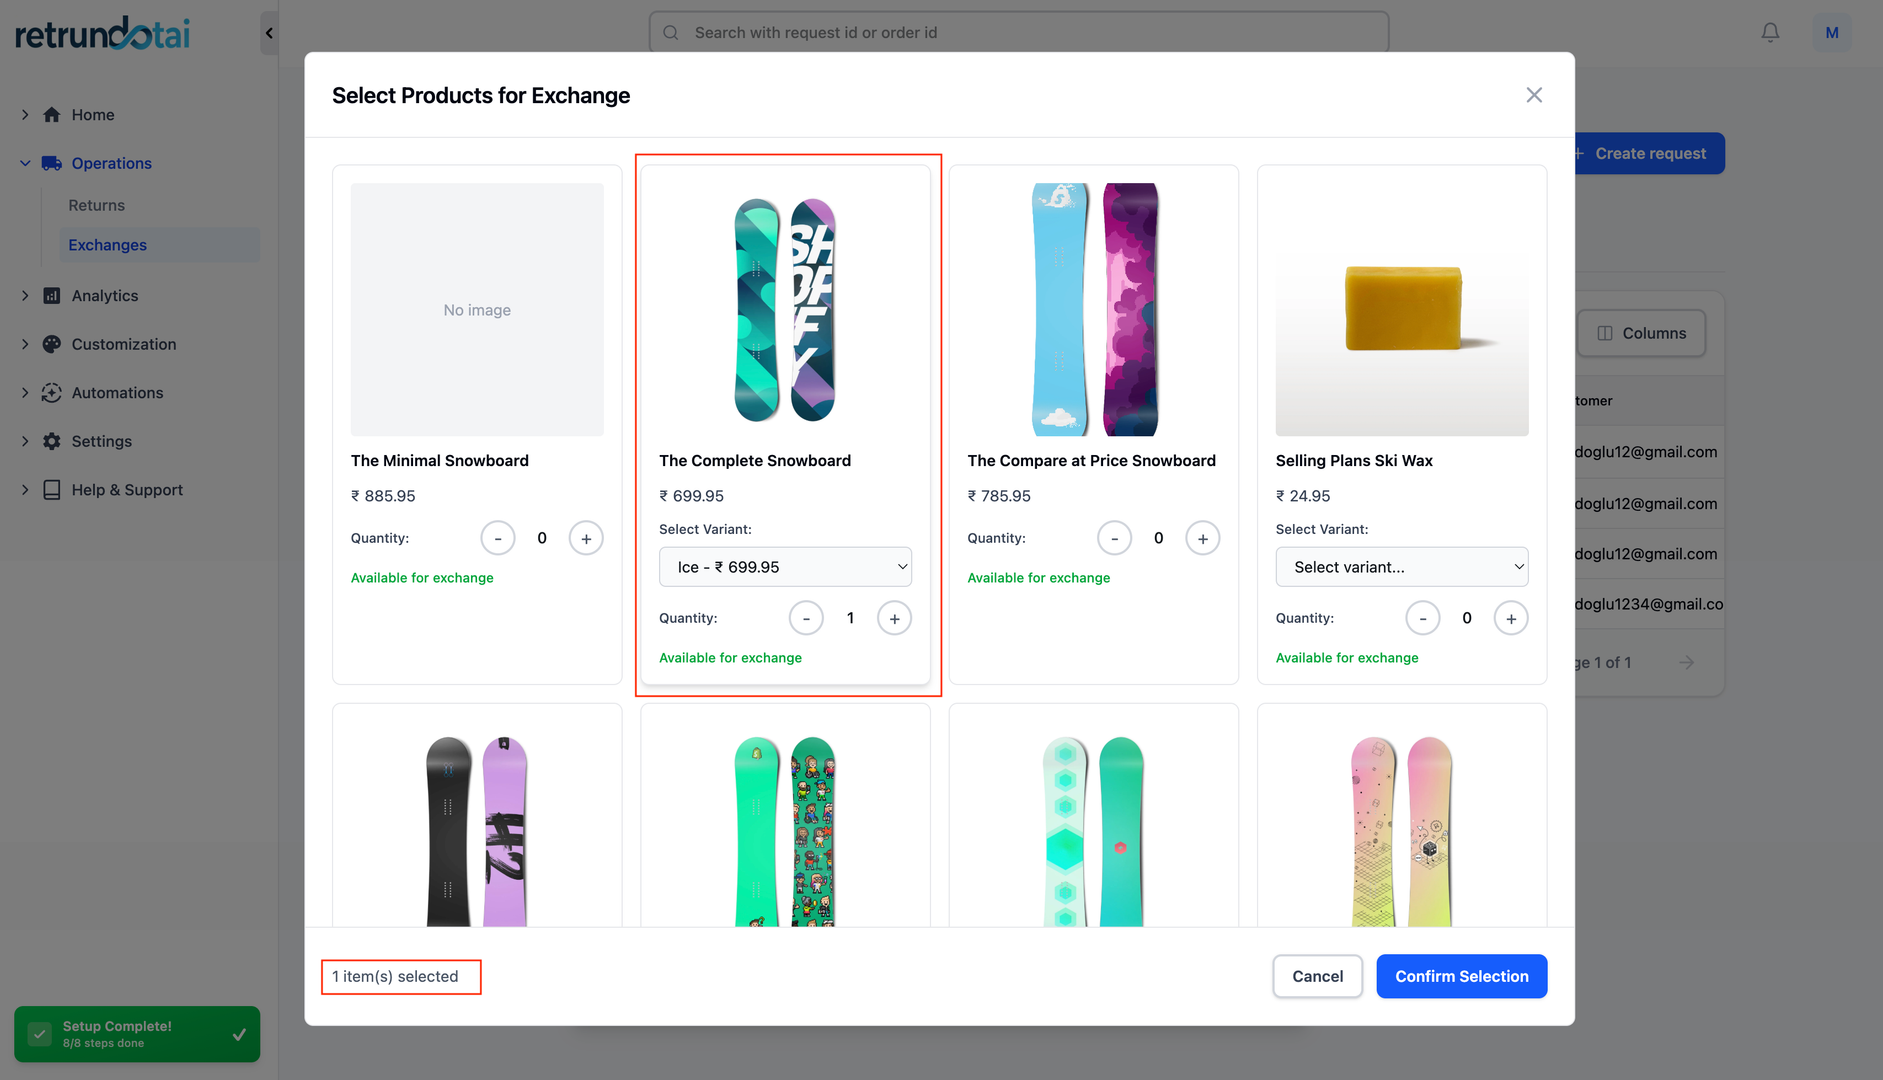
3. Add Exchange Items
Choose what the customer will receive in exchange for their returned items. You have multiple options to accommodate different exchange scenarios.
- 1Click "Add Product" for each item to be exchanged
- 2You'll see three options:
- 3Exchange for the same product (different size/color)
- 4Exchange for another variant
- 5Exchange for a different product
- 6Select the appropriate option
- 7Follow the prompts to choose the exchange item:
- 8Browse or search for products
- 9Select variant (size, color, etc.)
- 10Specify quantity
- 11The system will calculate any price difference
- 12Review the exchange summary
4. Complete the Exchange Request
Review all exchange details including price differences, then submit the request.
- 1Review all information for accuracy:
- 2Original items being returned
- 3New items for exchange
- 4Price difference (if any)
- 5Refund method for price difference
- 6Add notes if needed
- 7Click "Create Exchange" at the bottom of the summary section
- 8The exchange request will be created with "pending approval" status
Handle Refund Resolution After Approving Return Request
Approving the Return Request
Once a return request is created (manually or by the customer), you need to review and approve it before processing the refund.
- 1Navigate to the pending returns section
- 2Review the return request details:
- 3Customer information
- 4Items being returned
- 5Refund method chosen
- 6Any notes or special instructions
- 7Approve the return request if appropriate
- 8Click the "Refund" button
- 9The refund resolution modal will appear
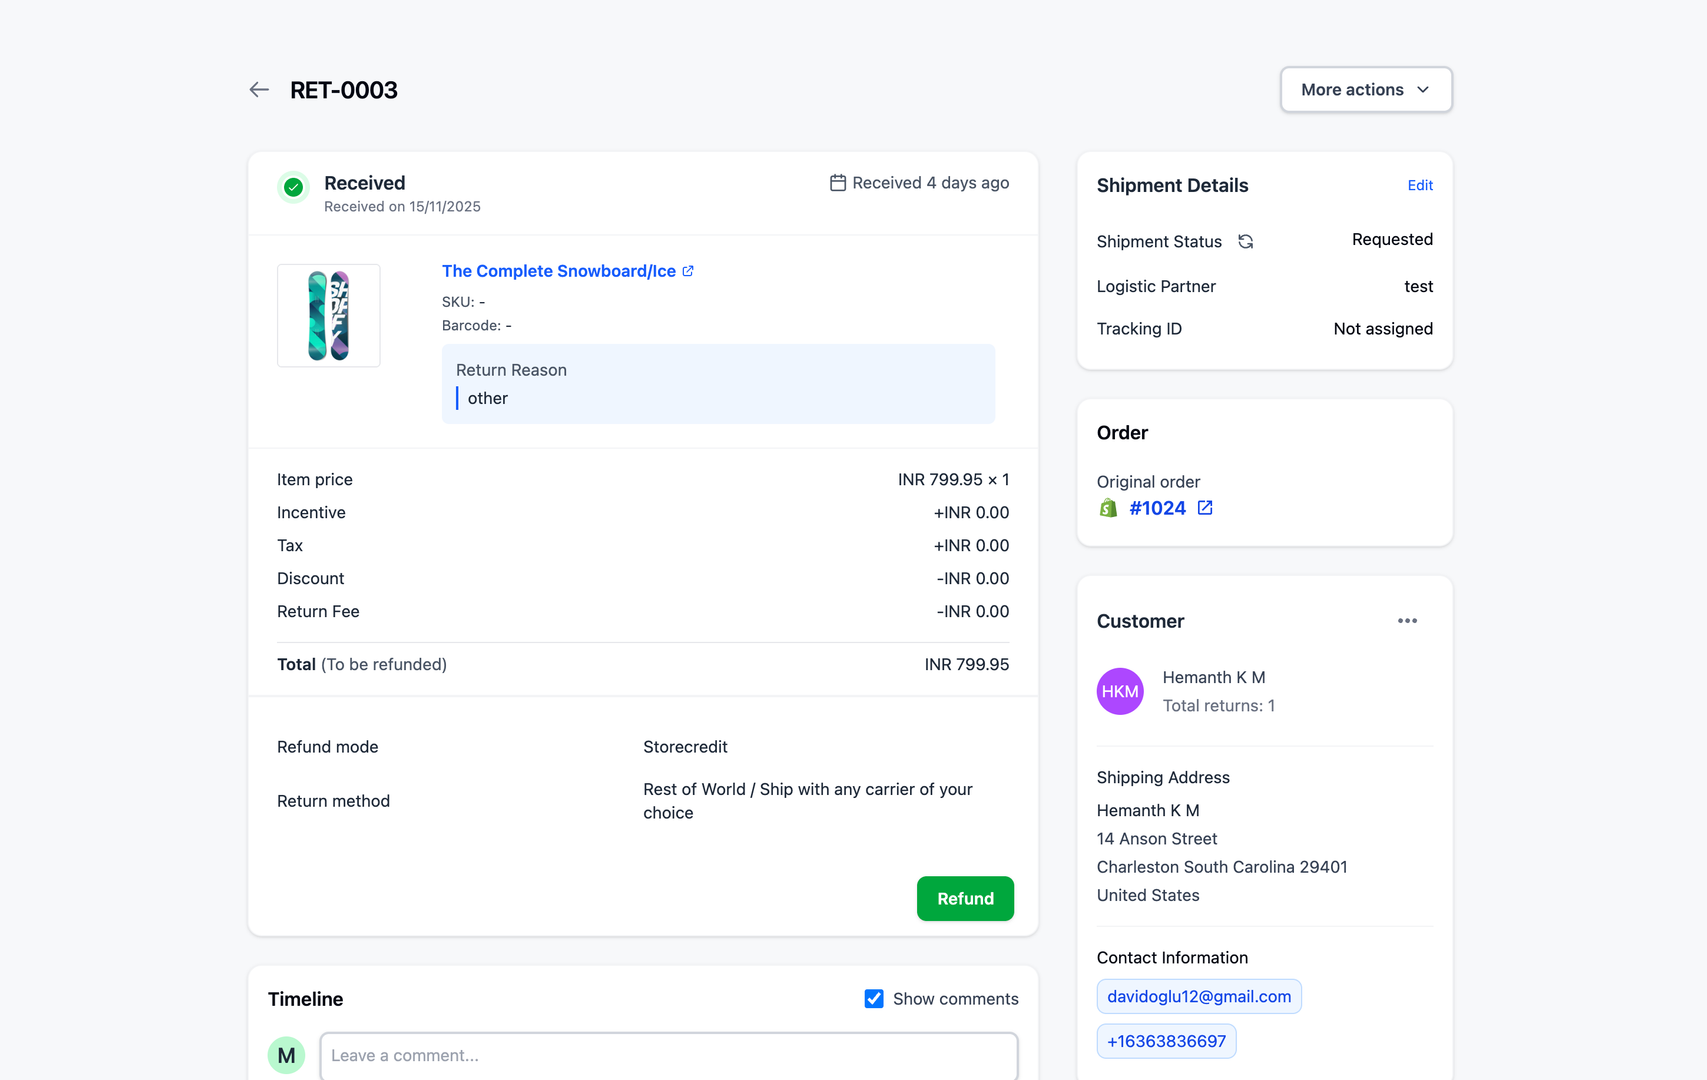
Refund Resolution Modal
After approving the return request, a modal will appear presenting options for refund resolution. By default, the resolution shown will be the one the shopper chose on the return portal.
- 1The modal displays the selected refund method
- 2You have 4 main options for processing the refund:
- 3Refund to Original Payment Method
- 4Refund to Gift Card
- 5Refund to Store Credit
- 6Refund to Discount Code
- 7Review the refund amount
- 8Select or confirm the refund method
- 9Click "Submit" to process the refund

Option A: Refund to Original Payment Method
This option refunds the amount to the payment method used in the original purchase. This is the most common refund method and is processed immediately in Shopify.
- 1Select "Refund to Original Payment Method"
- 2Review the refund amount
- 3Click "Submit"
- 4Returndotai will immediately create a Refund on your Shopify admin
- 5The customer receives the refund to their original payment method
- 6Refund typically processes within 5-10 business days (depending on payment provider)
Option B: Refund to Gift Card
This option issues the refund amount as a gift card, allowing customers to shop again in your store while retaining revenue.
- 1Select "Refund to Gift Card"
- 2Review the refund amount (including any bonus if configured)
- 3Click "Submit"
- 4Returndotai will immediately create a gift card on your Shopify admin
- 5Customer receives the gift card code via email
- 6Gift card can be used for future purchases
- Find more information: See "Refund to Gift Card" article for detailed setup and customization
Option C: Refund to Store Credit
This option adds the refund amount as store credit to the customer's account, integrated with Shopify's native store credit system.
- 1Select "Refund to Store Credit"
- 2Review the refund amount (including any bonus if configured)
- 3Click "Submit"
- 4Returndotai will immediately create store credit in the customer's account on your Shopify admin
- 5Customer can view and use store credit at checkout
- 6Store credit balance is visible in customer account
- Find more information: See "Refund to Store Credit" article for detailed setup and configuration
Option D: Refund to Discount Code
This option creates a discount code for the refund amount, providing flexibility for customers to use on future orders.
- 1Select "Refund to Discount Code"
- 2Review the refund amount and discount code settings
- 3Click "Submit"
- 4Returndotai will immediately create a discount code for the shopper in Shopify
- 5Customer receives the discount code via email
- 6Code can be applied at checkout for future purchases
- Find more information: See "Refund to Discount Code" article for detailed setup, configuration, and best practices
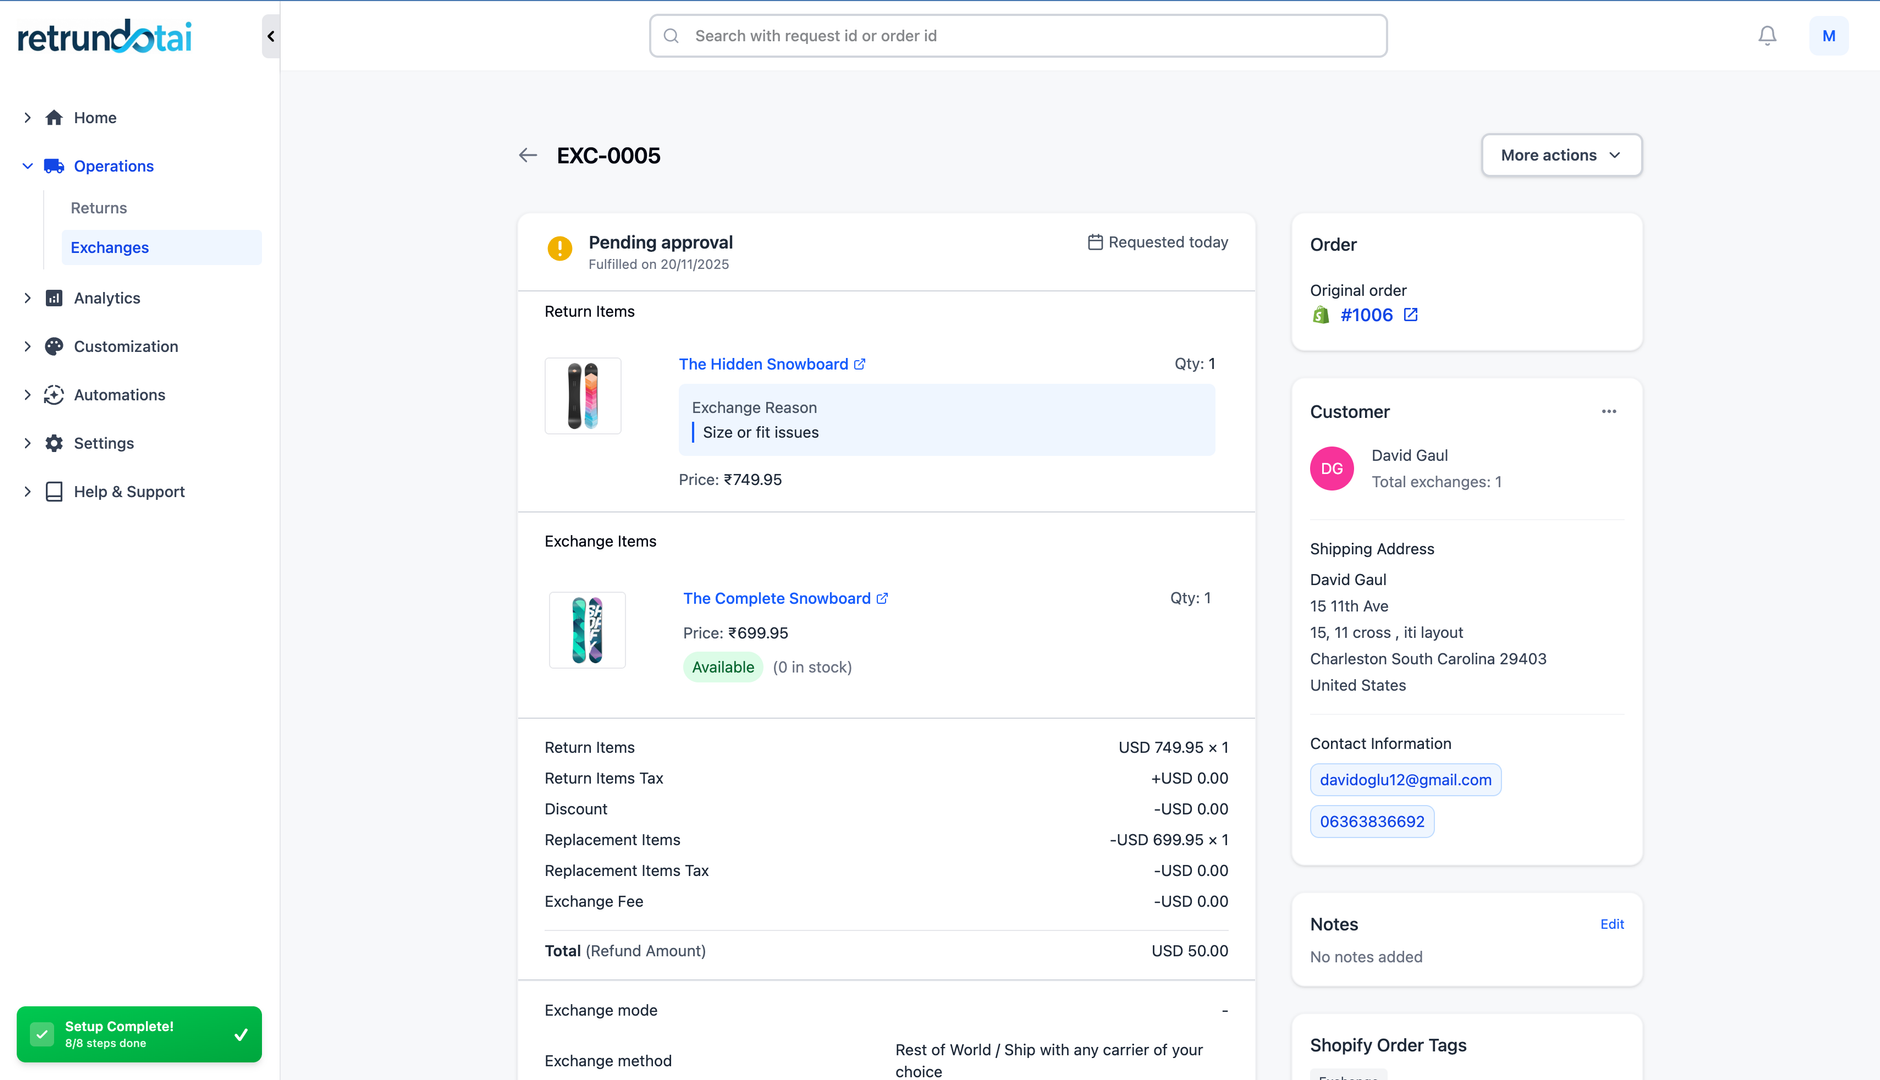
Create Exchange Order After Approving Exchange Request
Receiving and Approving the Exchange Request
Before creating exchange orders, you need to review and approve the exchange request.
- 1Locate the exchange request in the pending exchanges section
- 2Review the details of the request:
- 3Original items being returned
- 4New items for exchange
- 5Price difference
- 6Customer information
- 7If appropriate, approve the exchange request
- 8Click on the option to create exchange orders
- 9Returndotai will present you with four options
Exchange Order Creation Options
After approving the exchange request, Returndotai presents you with four options for personalizing your business return/exchange flow. Each option handles the exchange transaction differently in Shopify.
- 1Option A: Add Exchange Product to Original Order
- 2Option B: Create Order for Price Difference (Automatic)
- 3Option C: Create New Order with Full Item Price
- 4Option D: Do Not Create New Orders
Option A: Add Exchange Product to Original Order
This option adds the new product to the existing order in Shopify. Use this if you want to keep all related transactions under one order number.
- 1Available only when feature Shopify Sync is enabled
- 2Select "Add Exchange Product to Original Order"
- 3The new product is added to the existing order in Shopify
- 4All transactions remain under one order number
- 5Order timeline shows the exchange addition
- 6Inventory is automatically updated
- 7Best for: Keeping simple accounting and order tracking
Option B: Create Order for Price Difference (Automatic)
Returndotai will automatically create an order in Shopify admin for the price difference between the original and new product. This option is useful for capturing only the additional cost or refund amount.
- 1Select "Create Order for Price Difference"
- 2Returndotai calculates the difference automatically
- 3Example: If the difference is $1, an order for this amount will be created
- 4A new Shopify order is created for the difference amount
- 5In return request details, there is a card of Exchange order
- 6The card links to the new order on Shopify admin
- 7On Shopify order admin you can see:
- 8Note: "Create exchange order from order #{{1087}}"
- 9Tag: "Exchange order from #{{1087}}"
- 10Customer receives invoice for additional payment (if applicable)
- 11Best for: Capturing only the price difference
Option C: Create New Order with Full Item Price
This option creates a new order in Shopify with the full price of the exchange item. Use this when you want a separate, full-value transaction for the new item.
- 1Select "Create New Order with Full Item Price"
- 2A new Shopify order is created with the full exchange item price
- 3In return request details, there is a card of Exchange order
- 4The card links to the new order on Shopify admin
- 5On Shopify order admin you can see:
- 6Note: "Create exchange order from order #{{1087}}"
- 7Tag: "Exchange order from #{{1087}}"
- 8Customer receives full invoice for the new item
- 9Original order refund is processed separately
- 10Best for: Complete separation of transactions
Option D: Do Not Create New Orders
Select this if you prefer to create orders manually in Shopify. This gives you full control over the order creation process.
- 1Select "Do Not Create New Orders"
- 2The exchange is marked as approved
- 3No automatic order creation occurs
- 4You maintain full control to:
- 5Create orders manually in Shopify
- 6Use custom order workflows
- 7Handle complex exchange scenarios
- 8Integrate with third-party systems
- 9Best for: Businesses with custom workflows or special requirements
Price Differences in E-commerce Exchanges: 2 Key Scenarios
Scenario 1: The Exchanged Item is More Expensive
When a customer wants to exchange for a more expensive item, you need to collect the price difference. This scenario requires clear communication and smooth payment collection.
- Example: Customer bought an iPhone for $9, wants to exchange for a watch priced at $10
- Price difference: $1 ($10 - $9)
- Returndotai automatically calculates the difference
- You see option to create an order on Shopify for $1
- Customer pays the difference through the new Shopify order
- Customer completes checkout as usual
How to Handle More Expensive Exchanges
Follow these steps to ensure a smooth process when the exchange item costs more than the original.
- 1Calculate the price difference: Returndotai does this automatically
- 2Communicate clearly: Inform the customer about the price difference
- 3Collect additional payment:
- 4Choose option "Create an order on Shopify"
- 5System creates order for the difference amount
- 6Send invoice to customer via Shopify
- 7Customer pays at checkout securely
- 8Update order details: Modify the exchange order to reflect new item and payment
- 9Process the exchange once payment is received

Best Practices for Higher-Priced Exchanges
Ensure your exchange policy clearly states how price differences are handled
- Make the process of paying the difference as smooth as possible to reduce friction
- Train customer service staff to explain this scenario clearly and positively
- Send clear email notifications about the additional payment required
- Provide multiple payment options for the difference
- Set clear expectations about when the exchange will ship (after payment received)
Scenario 2: The Purchased Item is More Expensive
When a customer wants to exchange for a less expensive item, you need to refund the price difference. This is typically easier for customers and requires processing a partial refund.
- Example: Customer bought a watch for $90, wants to exchange for another priced at $70
- Price difference to refund: $20 ($90 - $70)
- You see option "Create an order on Shopify" with price of $0
- Merchant needs to refund $20 to shopper
- Refund can be processed using any refund method
- Exchange ships without additional customer action needed
How to Handle Less Expensive Exchanges
Follow these steps to process exchanges where the customer is owed a refund.
- 1Calculate the difference: Here it's $20 ($90 - $70)
- 2Process the refund using one of the refund methods:
- 3Refund to original payment method
- 4Issue store credit
- 5Provide gift card
- 6Create discount code
- 7Communicate clearly:
- 8Inform customer of the refund amount
- 9Explain which refund method will be used
- 10Provide timeline for refund processing
- 11Complete the exchange:
- 12Process the exchange shipment
- 13Update order records
- 14Send confirmation to customer

Selecting Your Preferred Exchange Option
Carefully consider which exchange order creation option best fits your business needs, accounting practices, and inventory management.
- 1Review each option carefully:
- 2Option A: Add to original order (requires Shopify Sync)
- 3Option B: Create order for price difference only
- 4Option C: Create new order with full item price
- 5Option D: Manual order creation
- 6Consider your business needs:
- 7Accounting practices and financial reporting
- 8Inventory management systems
- 9Customer experience preferences
- 10Integration with other tools
- 11Click on your chosen option to proceed
- 12The exchange order will be created according to your selection
Common Use Cases
Phone or Email Returns
Customer calls requesting a return - create the request on their behalf
- Email requests from customers who prefer not to use the portal
- VIP customers receiving concierge service
- Elderly or less tech-savvy customers needing assistance
Special Cases and Exceptions
Returns outside normal policy window requiring manager approval
- Damaged items discovered after delivery
- Wrong items shipped - immediate exchange needed
- Goodwill returns for customer retention
- Quality issues requiring immediate resolution
Bulk or Business Returns
Wholesale customers with special return arrangements
- Event rentals or trial programs
- Seasonal inventory returns
- B2B customers with negotiated return terms
Best Practices
Verify Customer Information
Always verify customer identity before creating returns on their behalf
- Confirm order details match customer records
- Document the reason for manual creation in the notes field
- Get customer confirmation (email, phone recording) when possible
Proper Documentation
Use the notes field to explain why the return was manually created
- Include reference numbers from phone calls or emails
- Document any special agreements or exceptions
- Note if the customer was unable to use the portal and why
Clear Communication
Inform customers when you create a return on their behalf
- Send confirmation with return details and next steps
- Explain the refund method and timeline
- Provide tracking information for return shipments
- Set clear expectations about when they'll receive their refund
Double-Check for Accuracy
Review all details before submitting
- Verify quantities match customer request
- Confirm correct refund method selected
- Ensure proper resolution type chosen
- Check that all required fields are completed
Troubleshooting
Common Issues and Solutions
Key points to understand:
- Order not found: Verify order number, check if order is in Shopify
- Refund method unavailable: Check your plan level and feature enablement
- Cannot select items: Ensure items haven't already been returned
- Price difference incorrect: Verify product prices in Shopify are current
- Exchange product not found: Check if product is published and available
- Cannot create order: Verify Shopify connection and permissions
Permission Requirements
If you cannot access the manual creation feature, check the following.
- 1Verify you have the appropriate staff permissions
- 2Check that the feature is enabled in your plan
- 3Ensure Shopify integration is active and connected
- 4Verify required Shopify permissions are granted
- 5Contact your account administrator if permissions are needed
Key Features
Flexible Creation
Create both return and exchange requests manually from the dashboard
Multiple Search Options
Find orders by order number, email, or phone number
All Refund Methods
Support for original payment, store credit, gift cards, and discount codes
Exchange Flexibility
Four different exchange order creation options to fit your workflow
Price Difference Handling
Automatic calculation and processing of exchange price differences
Detailed Documentation
Add notes and special instructions for each request
Important Notes
Document Manual Creations
Always use the notes field to explain why a return was manually created. This helps with tracking, auditing, and understanding customer service patterns.
Verify Customer Identity
Before creating a return or exchange on behalf of a customer, verify their identity through order details, email, or phone number to prevent fraud.
Choose the Right Exchange Option
For price difference exchanges, Option B (Create Order for Price Difference) is recommended for most businesses as it captures only the additional cost or refund amount.
Plan-Based Limitations
Some refund methods and resolution options may be unavailable depending on your plan level. Consider upgrading if you need access to all features.
Communicate Price Differences Clearly
When exchanges involve price differences, clearly explain to customers whether they need to pay more or will receive a refund, and how the process works.
Shopify Sync Required for Option A
The option to "Add Exchange Product to Original Order" is only available when Shopify Sync feature is enabled in your account.
Related Articles
How to resend notification in management details
Manually resend email notifications to customers from the order management detail page
How return notifications are sent
Understand the email notification flow for return and exchange requests
How to manage return request with pagination
Efficiently browse and filter return requests using pagination controls
How to prevent return request from specific date range
Set order date range policies to restrict returns during specific periods