Introduction
Exchange requests allow customers to swap purchased items for different variants, sizes, colors, or entirely different products. This guide walks you through the complete exchange management process, from receiving customer requests to creating exchange orders and resolving the transaction. Understanding each step ensures smooth operations and satisfied customers.
Access this feature
Navigate to /exchanges in your application.
Overview
What is an Exchange Request?
An exchange request occurs when a customer wants to replace a purchased item with a different product or variant instead of receiving a refund. This keeps revenue in your store while addressing customer needs.
- Customer returns original item and receives a replacement
- Exchange for different size, color, or variant
- Exchange for completely different product
- Price differences are handled with additional payment or partial refund
- Maintains customer relationship and revenue
- More cost-effective than returns for merchants
Exchange vs Return
Understanding the difference between exchanges and returns helps manage customer expectations and business operations.
- Exchange: Customer receives a replacement item (revenue retained)
- Return: Customer receives refund (revenue lost)
- Exchange: Requires additional inventory management
- Return: Simpler processing, just refund
- Exchange: May involve price difference handling
- Return: Fixed refund amount
- Exchange: Better for customer retention
- Return: Simpler for customers who changed their mind
Exchange Management Process Flow
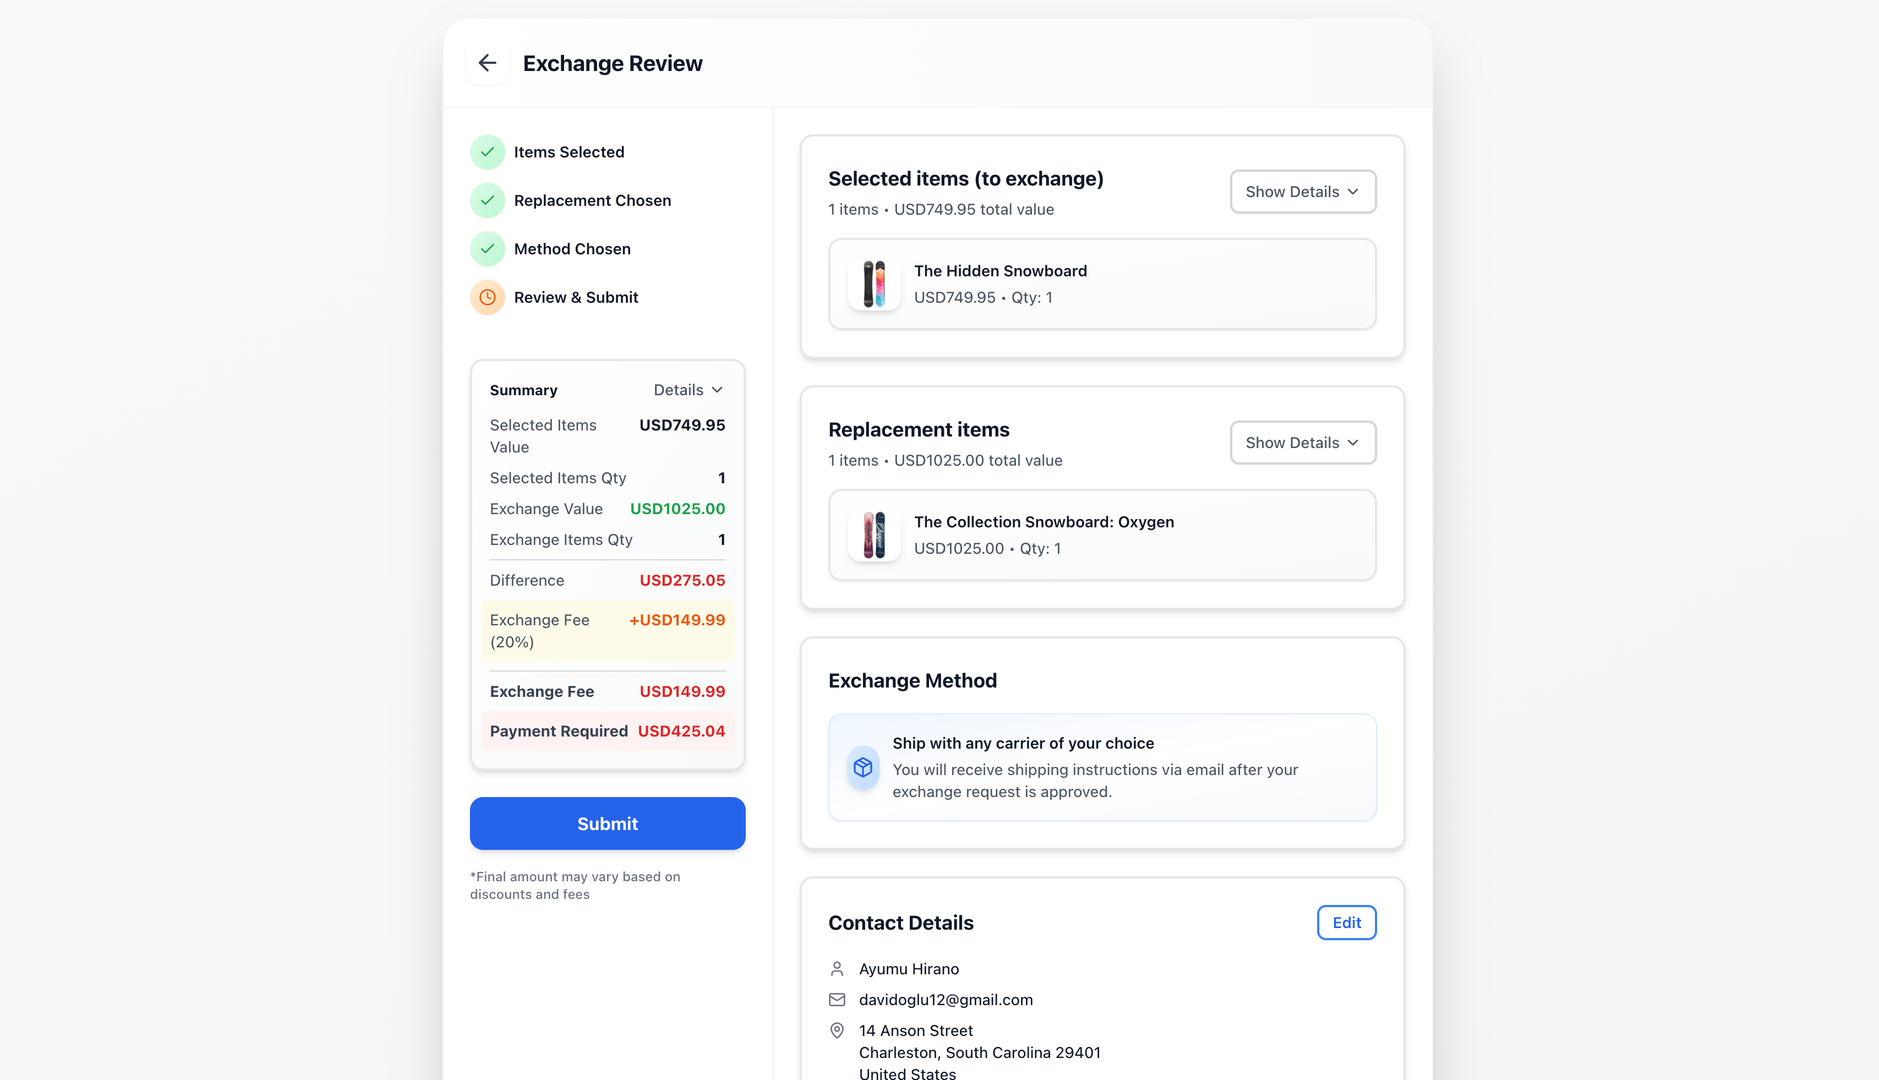
Step 1: Buyer Creates an Exchange Request
Customers initiate exchange requests through your branded return portal by following a simple step-by-step process.
- 1Customer navigates to the branded return page
- 2Enters "Order Number" and "Email or Phone Number"
- 3Clicks "Find your order" button
- 4Reviews order details and eligible items
- 5Clicks the "Exchange" button
- 6Selects items to exchange
- 7Chooses exchange options:
- 8Exchange for same product (different variant)
- 9Exchange for another variant
- 10Exchange for different product
- 11Selects new item(s) desired
- 12Reviews price difference (if any)
- 13Follows the instructions to complete request
- 14Submits exchange request
- 15Request status: "Pending Approval"
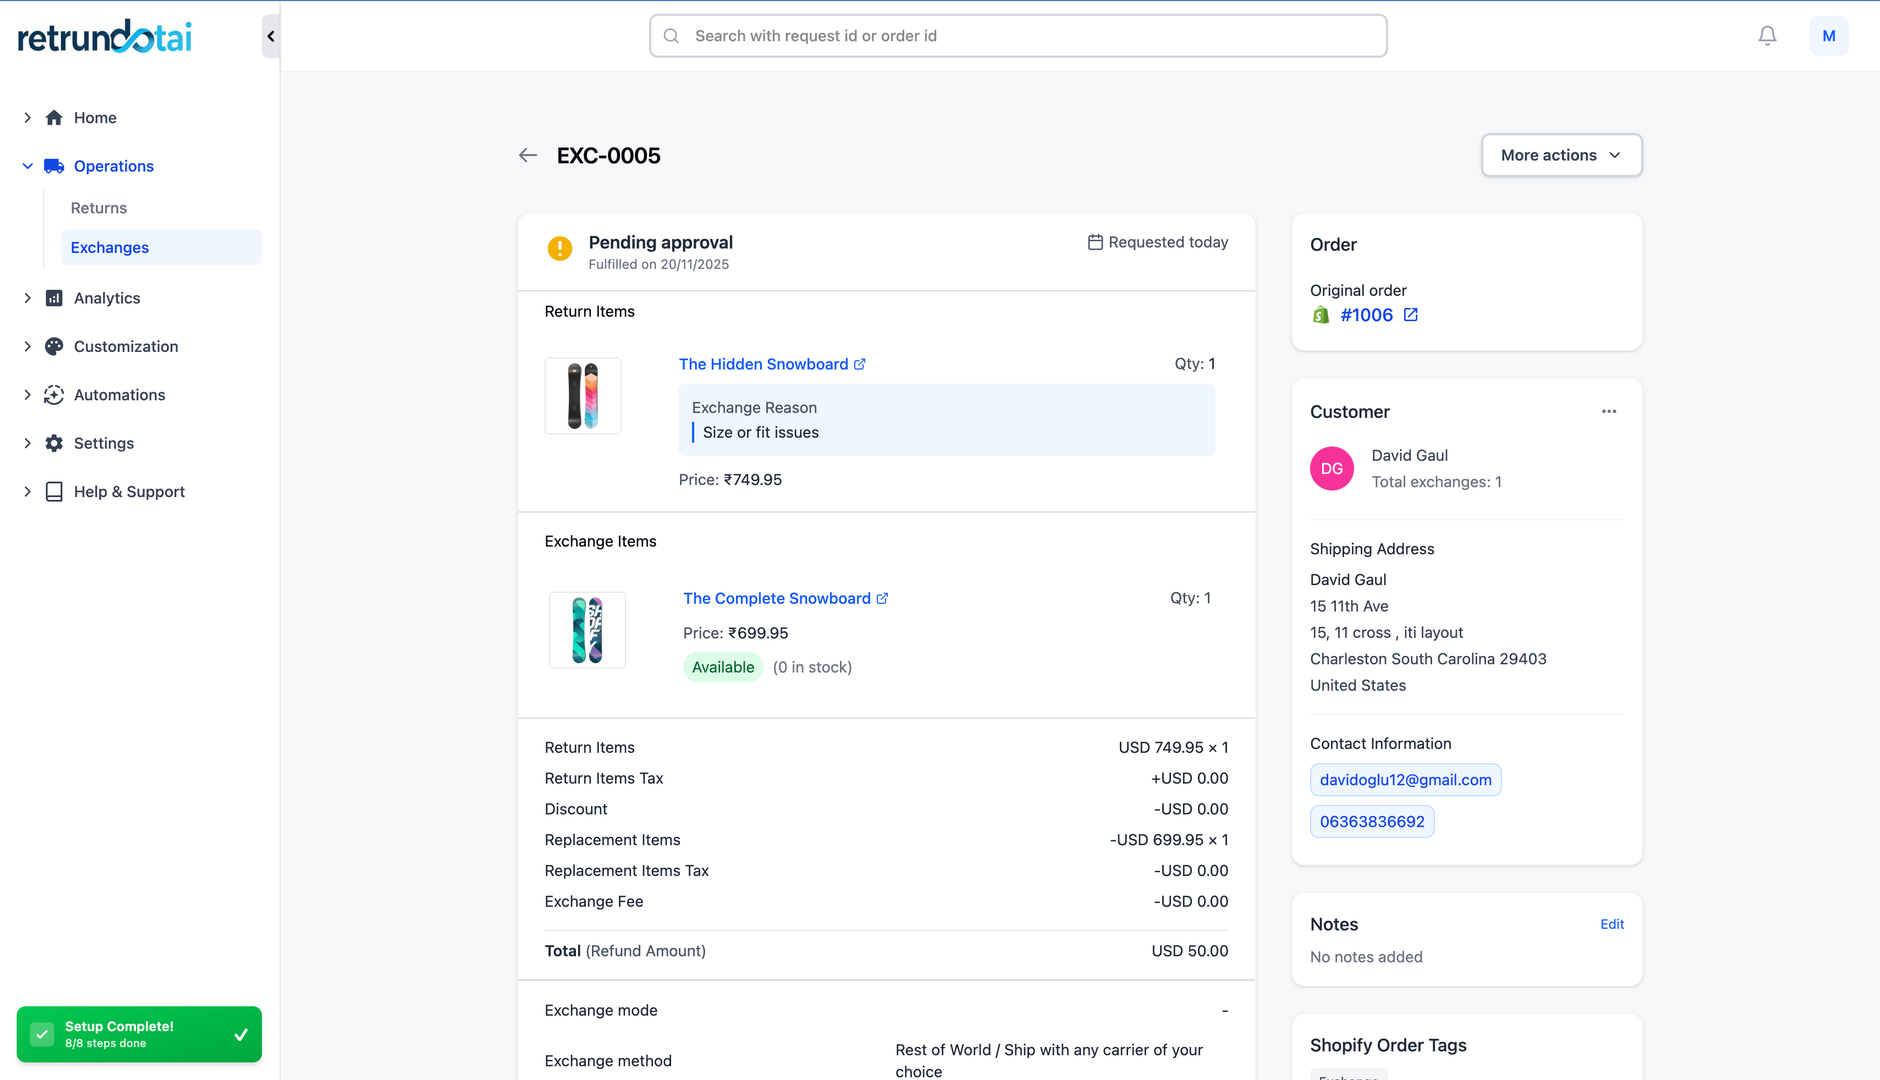
Step 2: Merchant Reviews Exchange Request
After a customer submits an exchange request, merchants need to review the details and make a decision to approve or reject.
- 1Go to Management section in Returndotai admin
- 2Click on the "Exchange" tab
- 3View all shoppers' exchange requests
- 4Click on a specific request to see details
- 5Review request information:
- 6Customer information
- 7Original items being returned
- 8New items requested
- 9Price difference (if applicable)
- 10Reason for exchange
- 11Customer notes or special requests
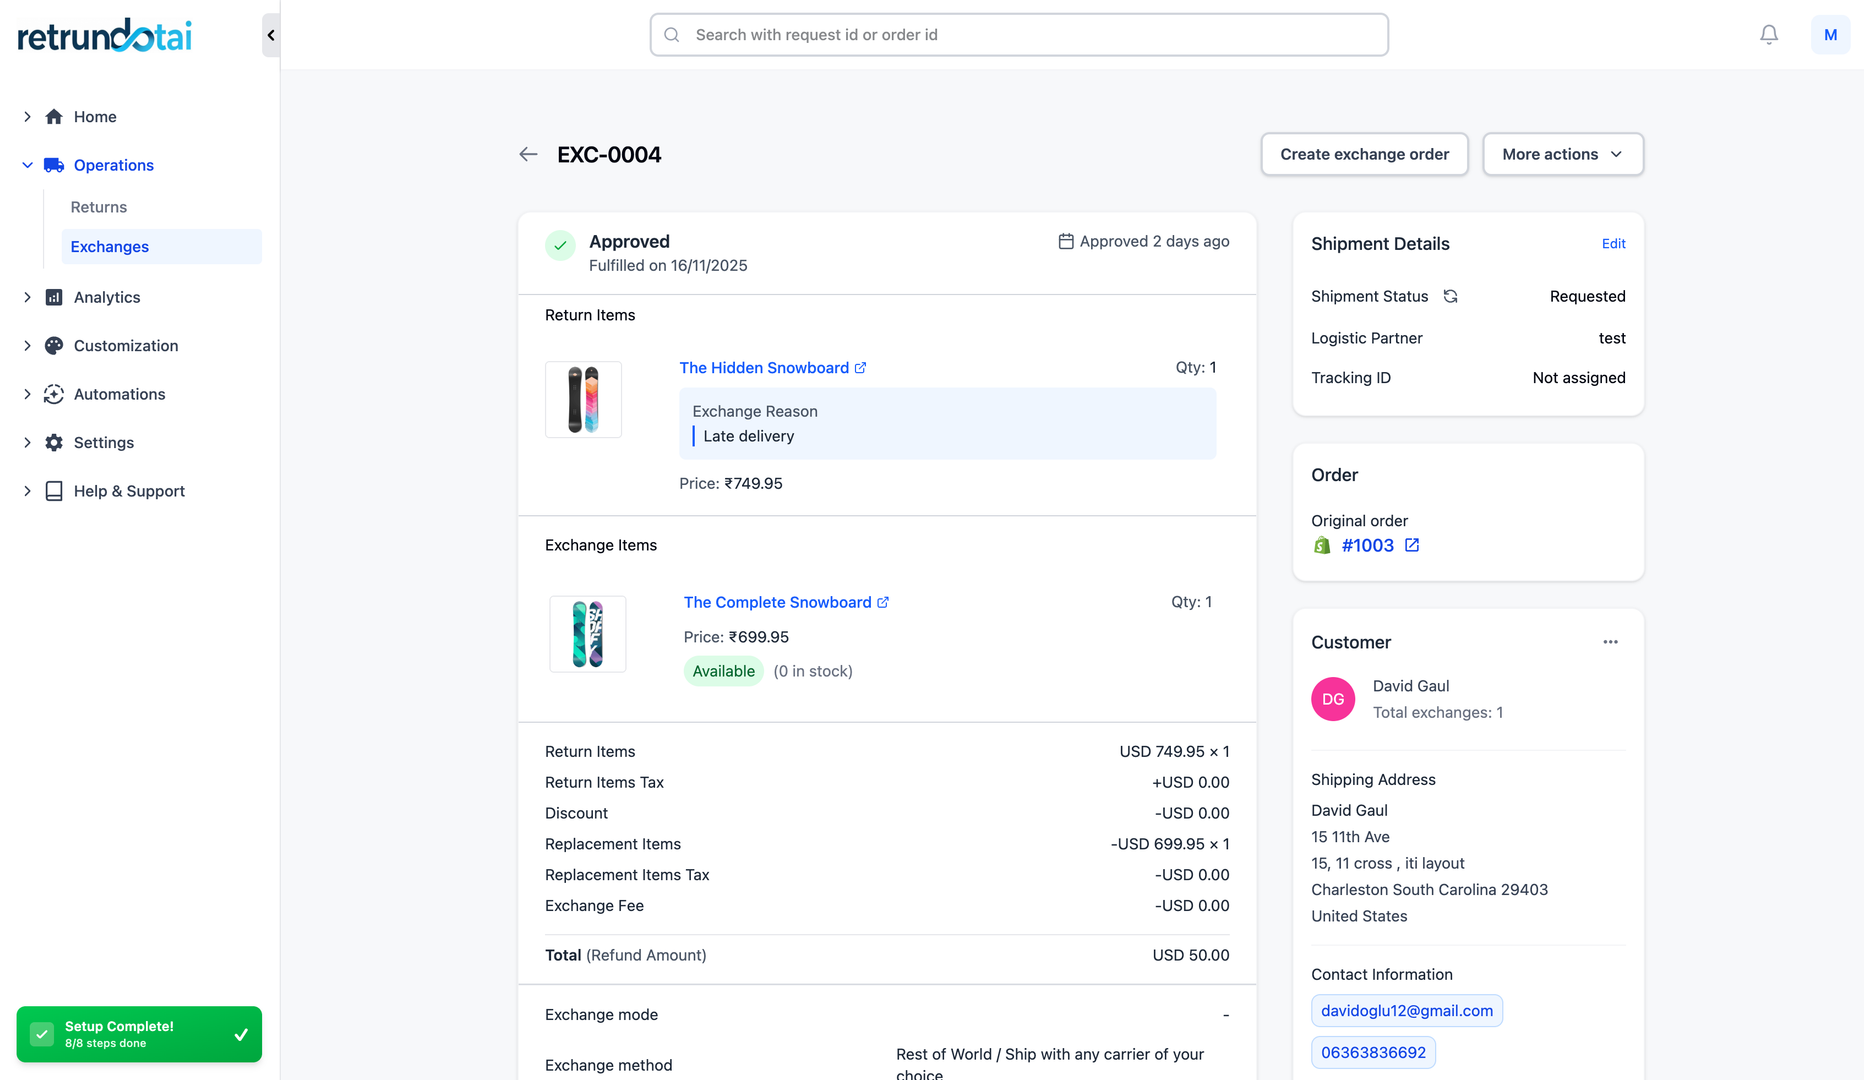
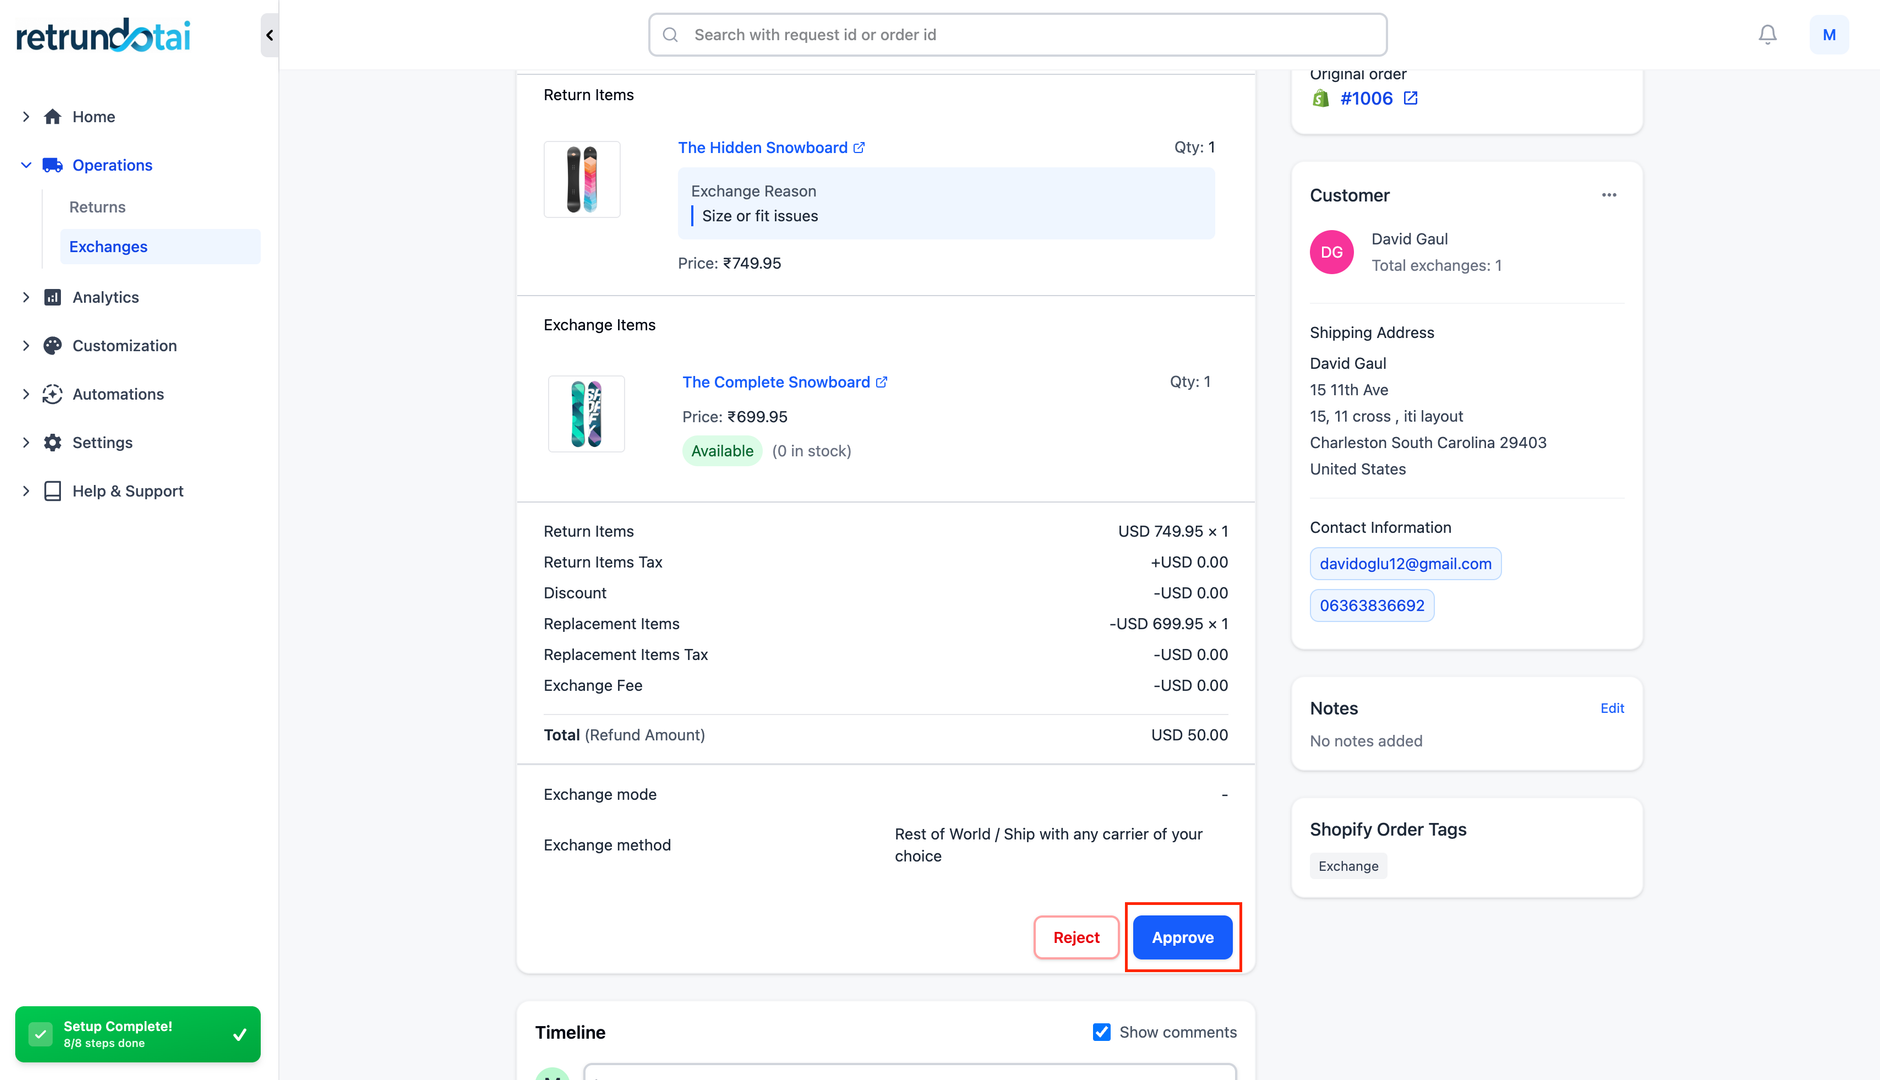
Step 3: Approve or Reject Request
Review the exchange request details and decide whether to approve or reject based on your policies and inventory availability.
- 1Review exchange request thoroughly
- 2Verify customer information and order history
- 3Check inventory availability for requested items
- 4Confirm price difference calculations
- 5Review exchange reason and policy compliance
- 6To Approve:
- 7Click the "Approve" button
- 8System sends approval notification to customer
- 9Status changes to "Approved"
- 10Proceed to next steps in the workflow
- 11To Reject:
- 12Click the "Reject" button
- 13Optionally add rejection reason/note
- 14System sends rejection notification to customer
- 15Status changes to "Rejected"
- 16Exchange request is closed
- 17Important: Ensure you verified sender's info and enabled all exchange notification templates to connect with your shoppers
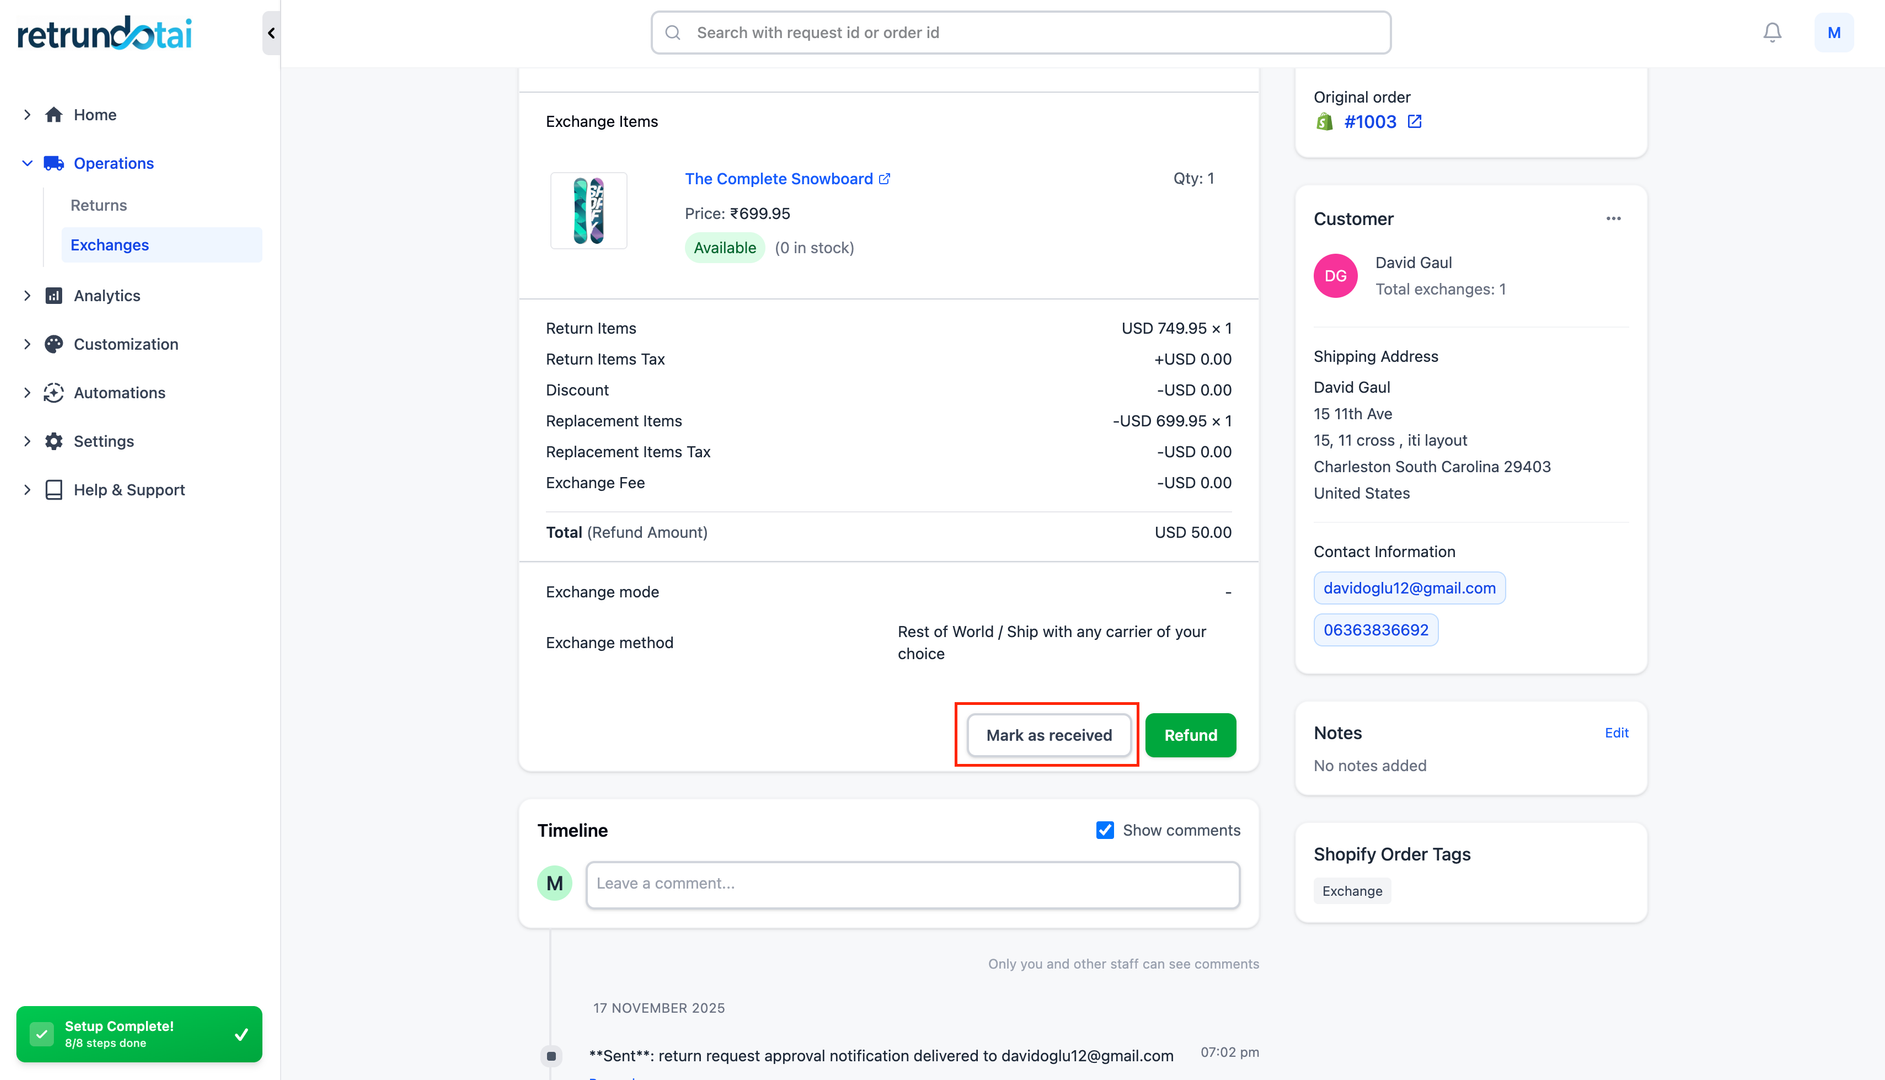
Step 4: Mark as Received
When you physically receive the returned item(s) from the customer, update the exchange request status to reflect this.
- 1Wait for customer to ship returned item
- 2Track shipment (if tracking provided)
- 3Receive and inspect returned item(s)
- 4Verify item condition matches expectations
- 5Check for damage or excessive wear
- 6In Returndotai admin:
- 7Open the exchange request details
- 8Click the "Mark as Received" button
- 9Status updates to "Received"
- 10Customer receives notification (if enabled)
- 11Proceed to restocking or exchange order creation
Step 5: Mark as Restocked (Optional)
After marking items as received, you can optionally mark them as restocked if they're suitable for resale and have been added back to inventory.
- 1Inspect received items for quality
- 2Determine if items are suitable for resale
- 3Add items back to inventory if appropriate
- 4In Returndotai admin:
- 5Click the "Mark as Restocked" button
- 6Status updates to "Restocked"
- 7This step is separate and optional
- 8Does not affect the process flow to exchange management
- 9Helps track inventory management
- 10Items not suitable for resale:
- 11Do not mark as restocked
- 12Handle according to your policies
- 13Continue with exchange order creation
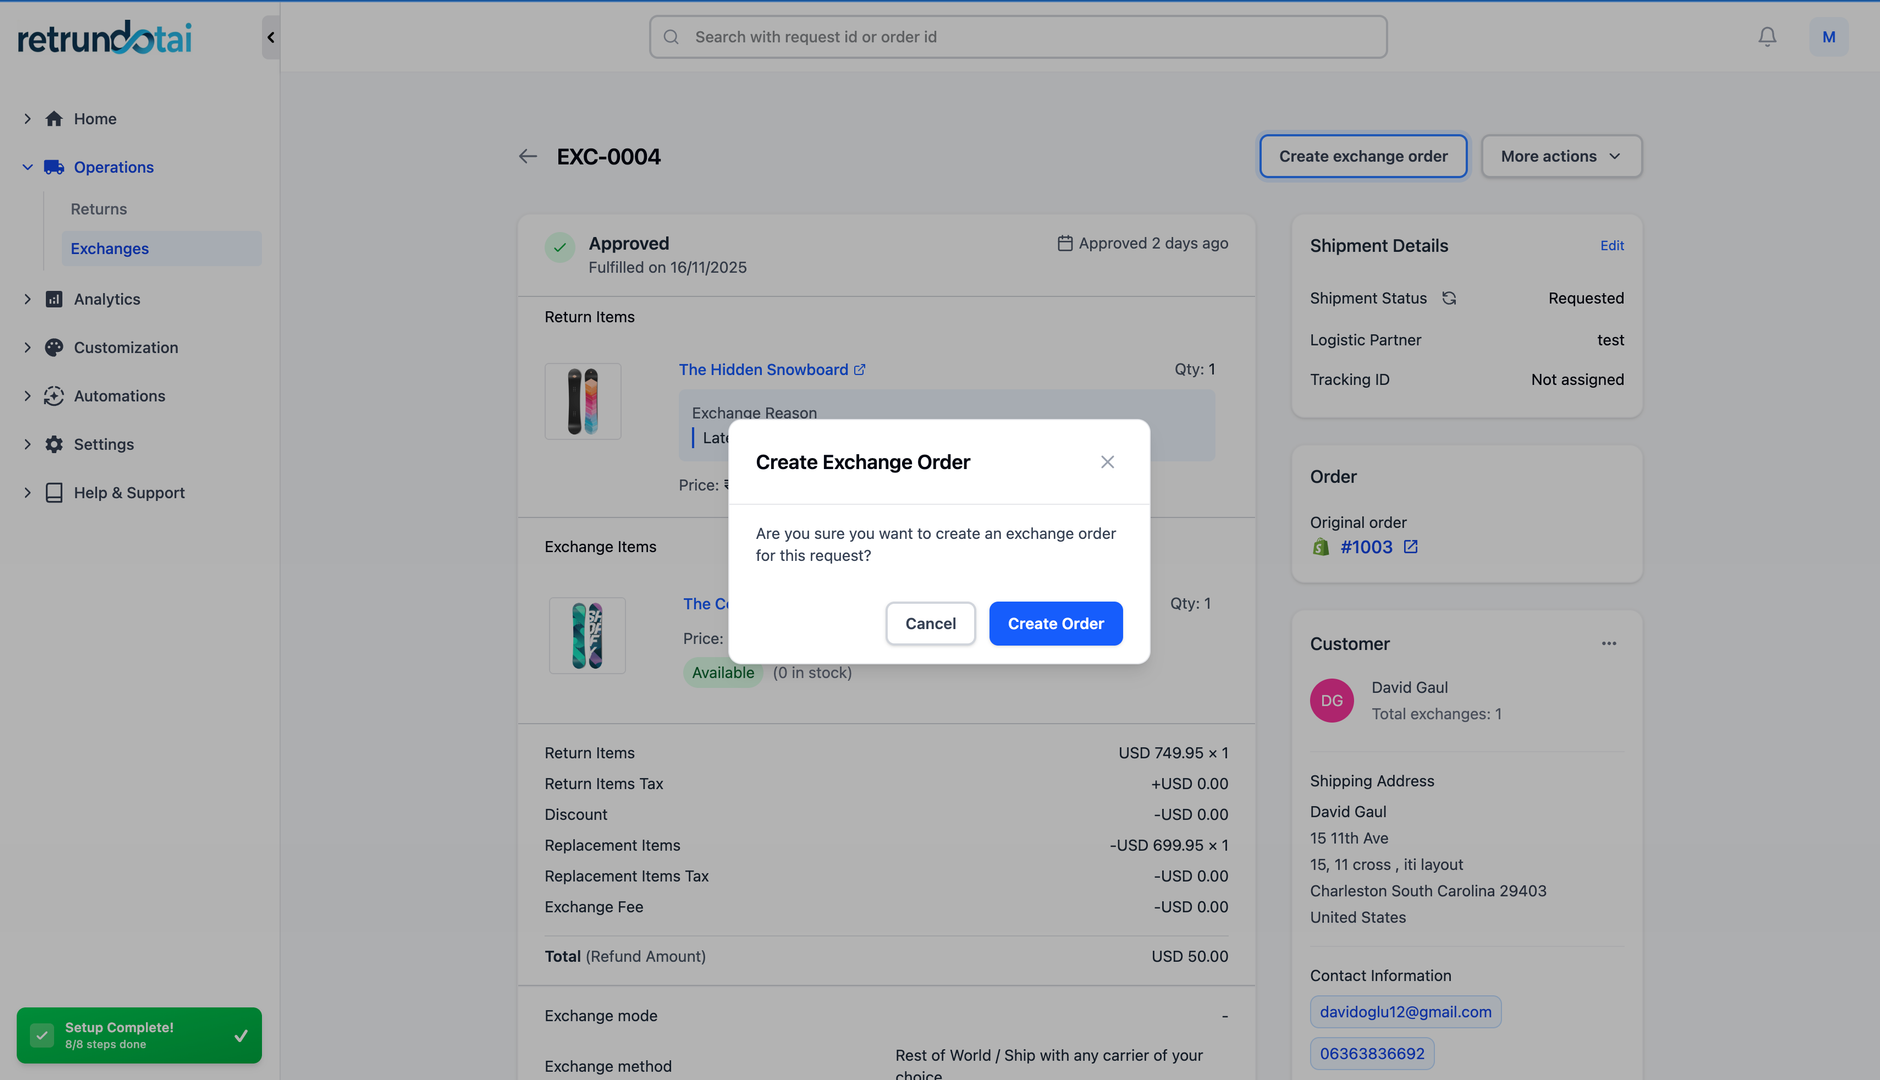
Step 6: Create an Exchange Order
After approving the exchange request, create an exchange order to send the new item(s) to the customer.
- 1After approving the request, you can create an exchange order
- 2Click the "Create Exchange Order" option
- 3Choose from exchange order creation methods:
- 4Option A: Add exchange product to original order
- 5Option B: Create order for price difference (automatic)
- 6Option C: Create new order with full item price
- 7Option D: Do not create new orders (manual)
- 8System creates order based on your selection
- 9Review order details in Returndotai
- 10Verify correct items and pricing
- 11View exchange order in Shopify admin
- 12Ship the exchange item to the customer:
- 13Process order in Shopify
- 14Fulfill exchange order
- 15Add tracking information
- 16Ship replacement item(s)
- 17After creating exchange order successfully:
- 18Status automatically transfers to "Merchant Shipped the Exchange"
- 19Customer receives shipment notification
- 20Exchange order card appears in request details
- 21See detailed article: "Create an exchange order after approving exchange request" for more information
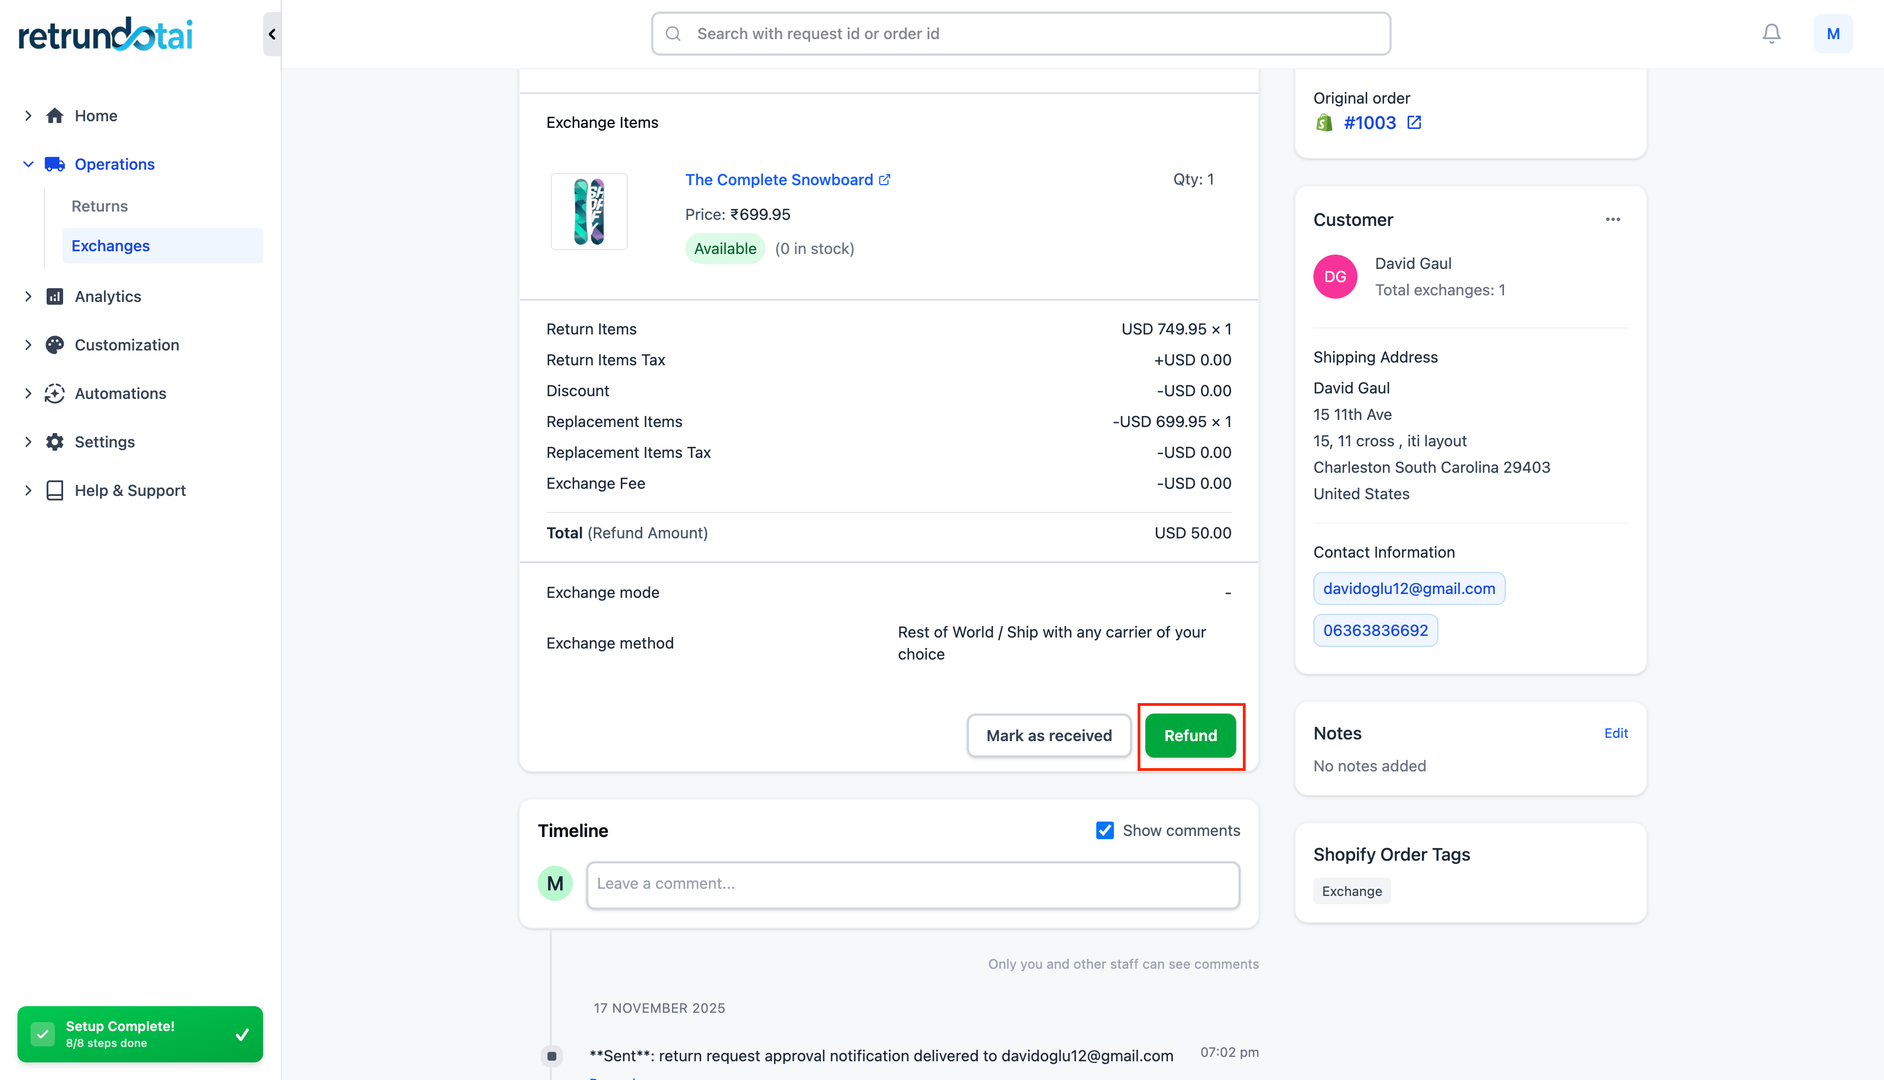
Step 7: Refund if Purchased Items Amount > Exchanged Items Amount
When the original item costs more than the replacement item, you need to refund the price difference to the customer.
- 1Calculate price difference:
- 2Original item price: $X
- 3Replacement item price: $Y
- 4Refund amount: $X - $Y
- 5Example scenario:
- 6Customer bought item for $100
- 7Exchanging for item worth $80
- 8Price difference: $20 (customer is owed refund)
- 9Process the refund:
- 10Click "Refund" button in exchange details
- 11Select refund method:
- 12Refund to original payment method
- 13Refund to store credit
- 14Refund to gift card
- 15Refund to discount code
- 16Confirm refund amount ($20 in example)
- 17Click "Submit" to process refund
- 18System handling:
- 19Refund is processed in Shopify
- 20Customer receives refund notification
- 21Exchange request updated with refund details
Step 8: Resolve the Exchange Request
After shipping the exchange items to the customer and handling any price differences, resolve the exchange request to mark it as complete.
- 1Confirm all steps are complete:
- 2✓ Exchange order created and shipped
- 3✓ Price difference refunded (if applicable)
- 4✓ Customer received replacement item
- 5✓ No pending actions required
- 6In exchange request details:
- 7Click the "Resolve" button
- 8Optionally add final notes
- 9Confirm resolution
- 10System actions:
- 11Status changes to "Resolved"
- 12Exchange request is marked complete
- 13Customer receives completion notification (if enabled)
- 14Request moves to completed exchanges
- 15All data is preserved for record-keeping
- 16The exchange request is now resolved and complete
Exchange Request Resolved
Once resolved, the exchange request is complete and appears in your exchange history with all details preserved.
- 1Exchange appears in resolved/completed section
- 2All timeline events are preserved
- 3Order references maintained
- 4Refund and payment records kept
- 5Customer communication history saved
- 6Available for reporting and analytics
- 7Can be referenced for future customer service
Handling Price Differences
Scenario A: Exchange Item Costs More (Customer Pays Difference)
When the replacement item costs more than the original, the customer needs to pay the price difference.
- 1Example:
- 2Original item: $50
- 3Replacement item: $70
- 4Price difference: $20 (customer owes)
- 5Merchant handling:
- 6Create exchange order for price difference ($20)
- 7Shopify creates order for $20
- 8Send invoice to customer
- 9Customer pays $20 via Shopify checkout
- 10After payment received, ship exchange item
- 11Customer experience:
- 12Receives invoice for $20 difference
- 13Pays via secure Shopify checkout
- 14Receives confirmation
- 15Exchange item ships after payment
- 16Best practice:
- 17Communicate price difference clearly
- 18Send payment request promptly
- 19Provide clear payment instructions
- 20Ship only after payment confirmed
Scenario B: Exchange Item Costs Less (Customer Receives Refund)
When the replacement item costs less than the original, refund the price difference to the customer.
- 1Example:
- 2Original item: $100
- 3Replacement item: $80
- 4Price difference: $20 (customer is owed)
- 5Merchant handling:
- 6Calculate refund amount ($20)
- 7Click "Refund" in exchange details
- 8Select refund method
- 9Process refund through Returndotai
- 10Ship exchange item (no payment needed)
- 11Refund method options:
- 12Original payment method (most common)
- 13Store credit
- 14Gift card
- 15Discount code
- 16Customer experience:
- 17Receives refund notification
- 18Gets $20 back via selected method
- 19Receives exchange item
- 20Overall spent $80 for new item
- 21Best practice:
- 22Process refund promptly
- 23Communicate refund method and timeline
- 24Ship exchange item without delay
- 25Confirm refund in customer notification
Scenario C: Exchange Items Have Equal Price
When both items have the same price, no additional payment or refund is needed.
- 1Example:
- 2Original item: $50
- 3Replacement item: $50
- 4Price difference: $0
- 5Merchant handling:
- 6Create exchange order
- 7No payment or refund required
- 8Ship exchange item directly
- 9Customer experience:
- 10No additional payment needed
- 11No refund issued
- 12Simply receives replacement item
- 13Straightforward exchange
- 14This is the simplest exchange scenario
Exchange Notifications
Verify Sender Information
Before exchanges can be processed with email notifications, verify your sender information.
- 1Navigate to Notifications section in Returndotai
- 2Click on "Sender info" tab
- 3Verify your email address:
- 4Enter your business email
- 5Complete email verification process
- 6Ensure email can send notifications
- 7This email will be used for all exchange notifications
Enable Exchange Notification Templates
Enable all exchange notification templates to keep customers informed throughout the exchange process.
- 1Go to Notifications section
- 2Find exchange-related templates
- 3Enable the following templates:
- 4Exchange request submitted
- 5Exchange request approved
- 6Exchange request rejected
- 7Exchange item received
- 8Exchange order shipped
- 9Exchange resolved/completed
- 10Customize email content (optional):
- 11Update subject lines
- 12Modify email body text
- 13Add your branding
- 14Include helpful instructions
- 15Save all template changes
Best Practices
Respond to Exchange Requests Promptly
Review exchange requests within 24 hours
- Approve/reject within 1-2 business days
- Fast responses improve customer satisfaction
- Set up notifications to alert when new requests arrive
- Train staff to handle exchanges efficiently
Communicate Clearly
Enable all exchange notification templates
- Verify sender information is correct
- Send updates at each status change
- Explain price differences clearly
- Provide tracking information for exchanges
- Set clear expectations for timelines
Manage Inventory Carefully
Check inventory before approving exchanges
- Reserve exchange items after approval
- Mark items as restocked when suitable
- Track exchanged items separately
- Update inventory counts promptly
- Monitor exchange trends for restocking
Inspect Returned Items
Carefully inspect items when received
- Document condition with photos if needed
- Verify items match what was approved
- Check for damage or excessive wear
- Decide on restocking eligibility
- Add notes to exchange request about condition
Troubleshooting
Common Issues and Solutions
Common troubleshooting solutions for exchange processing issues:
- Customer can't find exchange option:
- Verify exchange is enabled in settings
- Check if item is eligible for exchange
- Ensure customer is within exchange window
- Price difference calculation incorrect:
- Verify product prices in Shopify are current
- Check for sale prices or discounts
- Recalculate manually if needed
- Contact support if calculations don't match
- Cannot create exchange order:
- Verify Shopify connection is active
- Check that replacement item is in stock
- Ensure you have necessary Shopify permissions
- Try refreshing the page and attempting again
- Notifications not sending:
- Verify sender email is verified
- Check notification templates are enabled
- Ensure customer email is correct
- Check spam/junk folders
Key Features
Complete Exchange Workflow
Comprehensive process from request submission to resolution
Price Difference Handling
Automatic calculation and processing of exchange price differences
Multiple Exchange Options
Exchange for same product, variant, or different product entirely
Shopify Integration
Seamless exchange order creation in Shopify admin
Automated Notifications
Keep customers informed at every step of the exchange process
Inventory Tracking
Mark items as received and restocked for inventory management
Important Notes
Verify Sender Info and Enable Notifications
Before processing exchanges, ensure you verified sender's info and enabled all exchange notification templates to keep customers informed throughout the process.
Respond Promptly to Exchange Requests
Review and approve/reject exchange requests within 24-48 hours to maintain customer satisfaction and trust in your exchange process.
Handle Price Differences Clearly
When there's a price difference, communicate clearly whether customer needs to pay more or will receive a refund. Use Returndotai's automatic calculation feature.
Inspect Items Before Restocking
Always inspect returned items for quality and condition before marking as restocked. Document any issues in the exchange request notes.
Resolve Only When Complete
Only click "Resolve" after all steps are complete: exchange shipped, price difference handled, and customer received replacement. Resolving closes the exchange request.
Use Exchange Order Creation Options
Choose the appropriate exchange order creation method based on your workflow. Option B (price difference only) is recommended for most exchanges with price variations.
Related Articles
How to resend notification in management details
Manually resend email notifications to customers from the order management detail page
How return notifications are sent
Understand the email notification flow for return and exchange requests
How to manage return request with pagination
Efficiently browse and filter return requests using pagination controls
How to prevent return request from specific date range
Set order date range policies to restrict returns during specific periods