Introduction
Returndotai Returns & Exchanges offers shoppers a refund method by using a discount code. This allows shoppers to use the code to continue shopping in your store, helping you retain revenue while providing customers with purchasing power for their next order. Discount codes are an excellent way to encourage repeat purchases while maintaining customer satisfaction.
Access this feature
Navigate to /settings/policies in your application.
Overview
What is Discount Code Refund?
When customers choose "Refund to Discount Code" as their refund resolution, they receive a unique discount code that can be applied to future purchases. This method benefits both merchants and customers by keeping revenue within the store while providing flexibility for shoppers.
- 1Customer requests a return and selects "Discount Code" as refund method
- 2Merchant approves the return request
- 3Returndotai auto-generates a discount code in Shopify
- 4Customer receives the discount code via email
- 5Customer applies the code at checkout for their next purchase
- 6Code value is based on return amount and configured percentage
Video Tutorial
Watch this instructional video to see what happens when customers choose "Refund to Discount Code" as their resolution method.
How to Set Up Refund to Discount Code
Step 1: Enable Discount Code Feature
The discount code refund feature is available in your Returndotai account. Once enabled, customers will be able to select "Refund to Discount Code" as their refund option when creating return requests.
- 1Ensure your Returndotai account has the discount code feature enabled
- 2Verify Shopify integration has discount creation permissions
- 3Configure return reasons in Settings > Reasons to control which products are returnable
- 4When customers create return requests, they will see "Discount Code" as a refund option
- 5The discount code amount will be based on the return value
- 6Approve return requests that select discount code as the refund method
- 7Returndotai will automatically generate the discount code in Shopify
- 8Customers receive the code via email notification
Step 2: Set Up Notifications to Shoppers
To ensure customers receive their discount codes, you need to verify your sender information and enable the discount code notification template.
- 1Navigate to Notifications section in Returndotai
- 2Click on the "Sender info" tab
- 3Verify your email address:
- 4Enter your business email
- 5Complete email verification process
- 6Ensure the email can send notifications
- 7This email will be used to send discount codes to customers

Step 3: Enable Notification Templates
Enable the notification template specifically for discount codes so customers receive their codes automatically.
- 1Stay in the Notifications section
- 2Find notification templates list
- 3Locate "Discount code refund" or "Refund to discount code" template
- 4Enable the template toggle
- 5Customize the email content (optional):
- 6Update subject line
- 7Modify email body text
- 8Add usage instructions
- 9Include expiration information
- 10Save template changes

Customer Experience
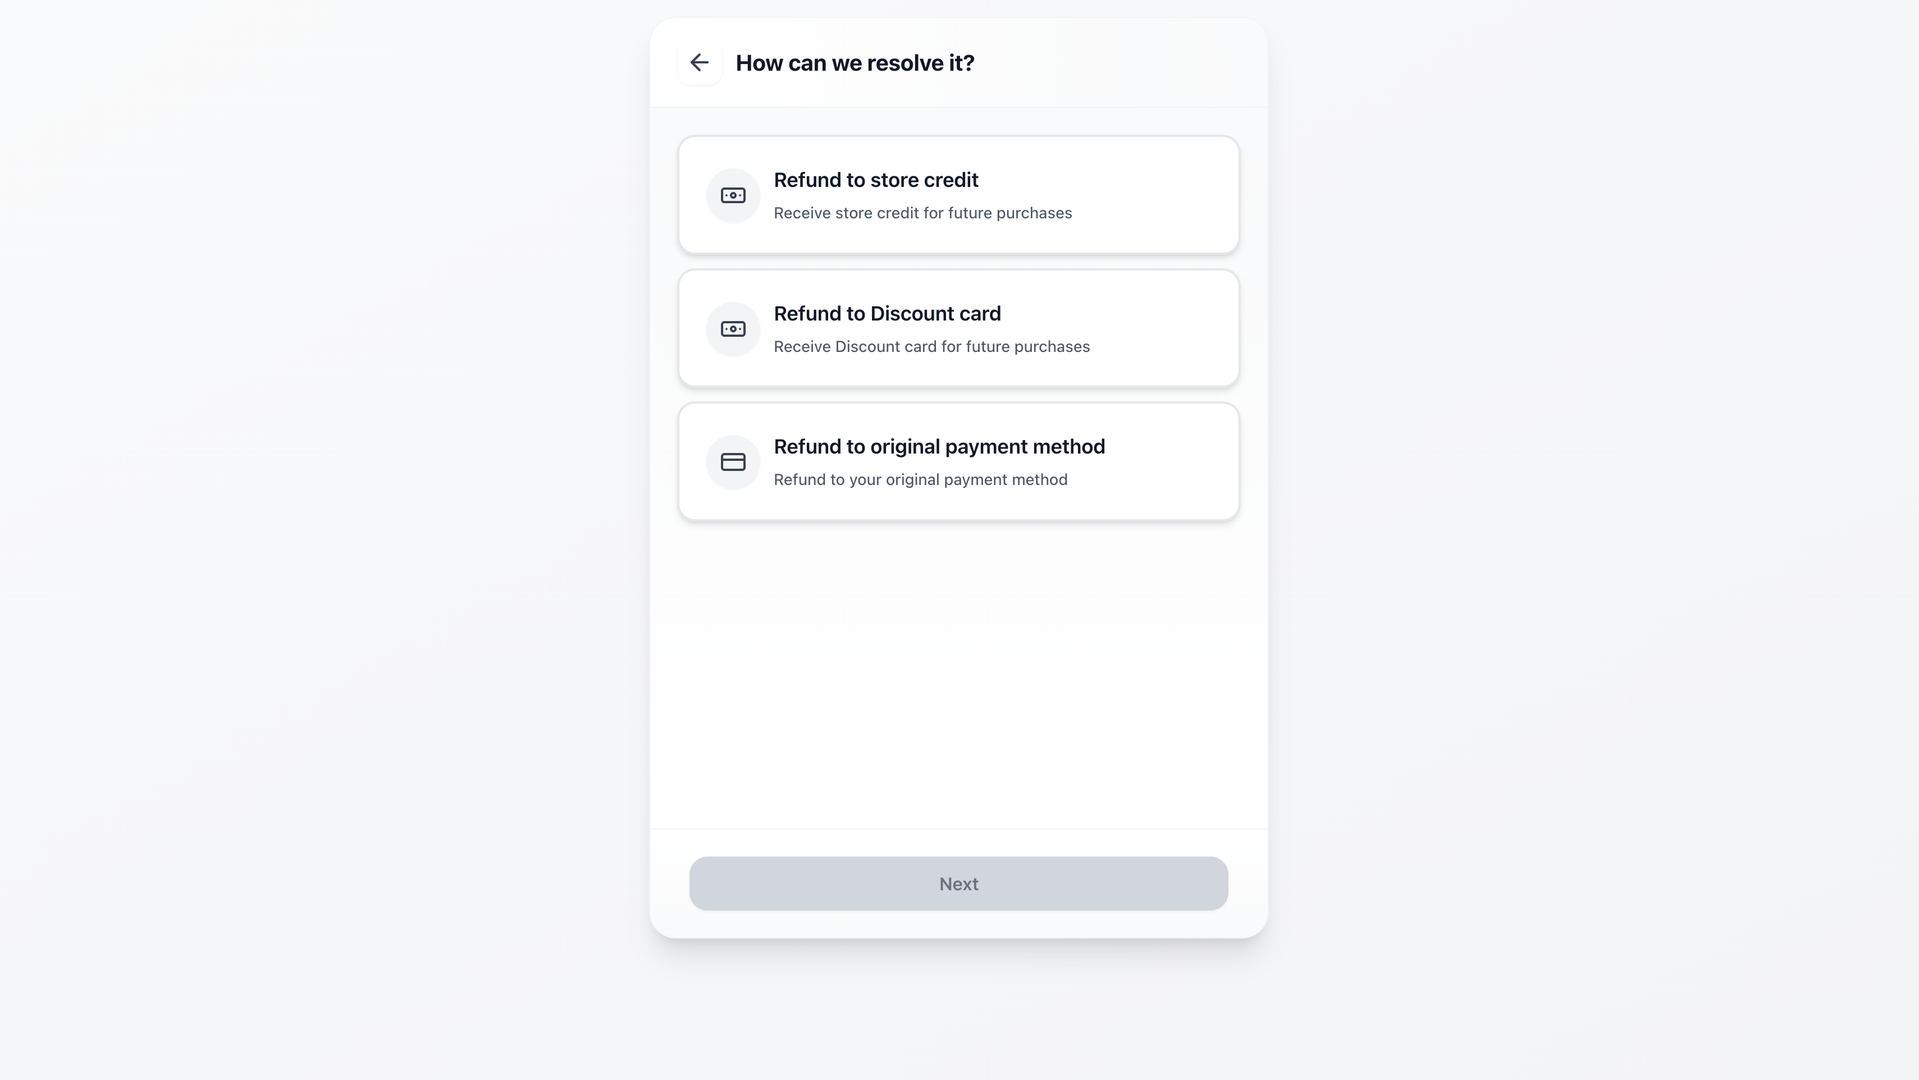
Selecting Discount Code in Returns Portal
When shoppers create a return request, they can choose "Refund to Discount Code" as their preferred refund method.
- 1Customer accesses the returns portal
- 2Enters order number and email
- 3Selects items to return
- 4Chooses refund method
- 5Selects "Refund to Discount Code" option
- 6Sees discount value information
- 7Submits return request
- 8Awaits merchant approval
Merchant Workflow
1. View Request Details
You can find and check return requests by going to the Management tab. Requests with discount code refunds will show "Refund to Discount Code" as the resolution.
- 1Navigate to Management tab in Returndotai admin
- 2View list of return requests
- 3Click on a request to see details
- 4Resolution field shows "Refund to Discount Code"
- 5Review return items and amounts
- 6Verify customer information
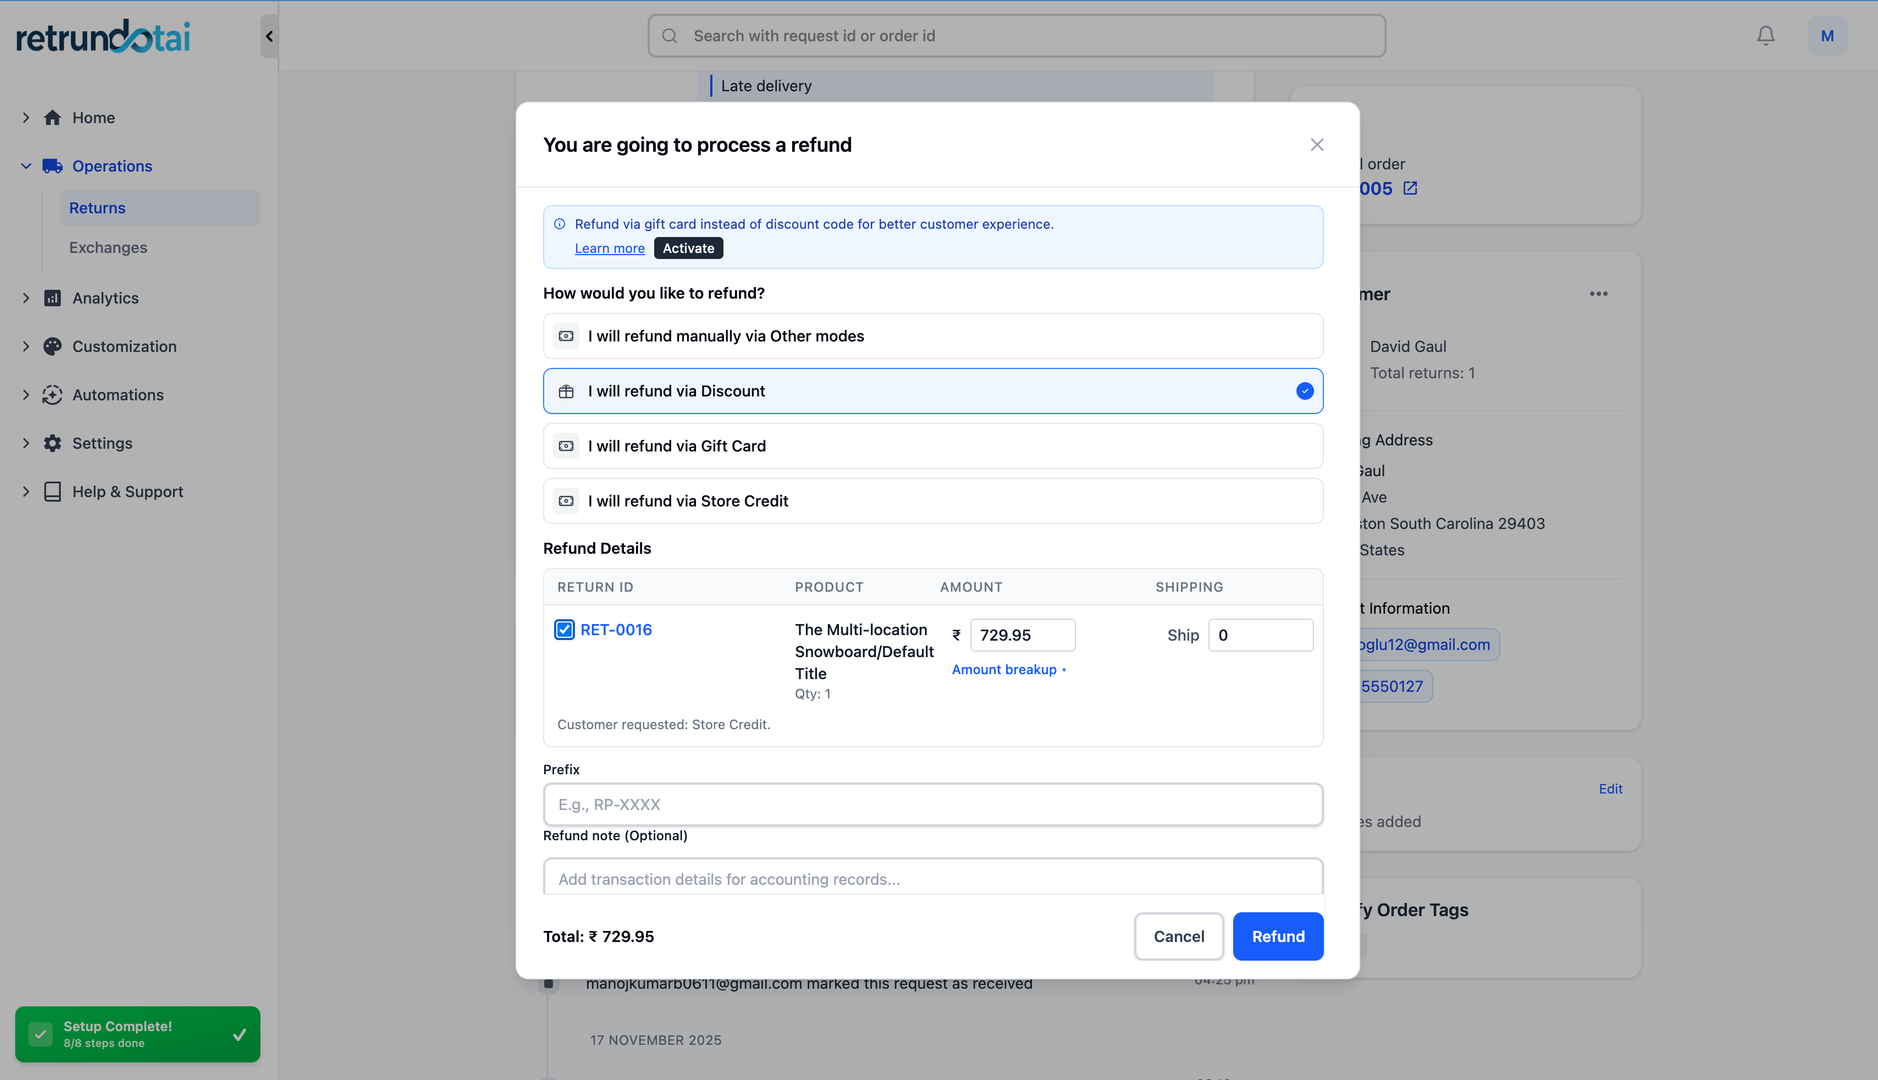
2. Approve and Issue Discount Code
After you approve the return request, the "Refund" button will appear. Clicking it will generate the discount code and notify the customer.
- 1Click "Approve" on the return request
- 2The "Refund" button appears after approval
- 3Click the "Refund" button
- 4Review discount code details in the modal
- 5Click "Submit" to issue the discount code
- 6System auto-generates discount code in Shopify
- 7Customer receives email notification with code
- 8Discount code is now active and ready to use
Discount Code Generation
How Discount Codes Are Generated
After submitting the refund, a discount code will be auto-generated in your Shopify admin with the configured value type and amount.
- 1Returndotai creates discount code in Shopify
- 2Code uses the prefix you configured (e.g., RETURN-12345)
- 3Discount type is set based on your configuration:
- 4Fixed amount: Specific dollar value
- 5Percentage: Percentage of return value
- 6Code is automatically applied to customer account
- 7Code details are logged in Returndotai
- 8Expiration date set (if configured)
Discount Calculation Example
For example, if a customer returns an order worth $100 and the merchant setup discount value is 10%, here's how it works:
- Return value: $100
- Discount configuration: 10% of return value
- Calculation: $100 × 10% = $10
- Generated discount code value: $10 fixed amount
- Customer can use this $10 code on their next order
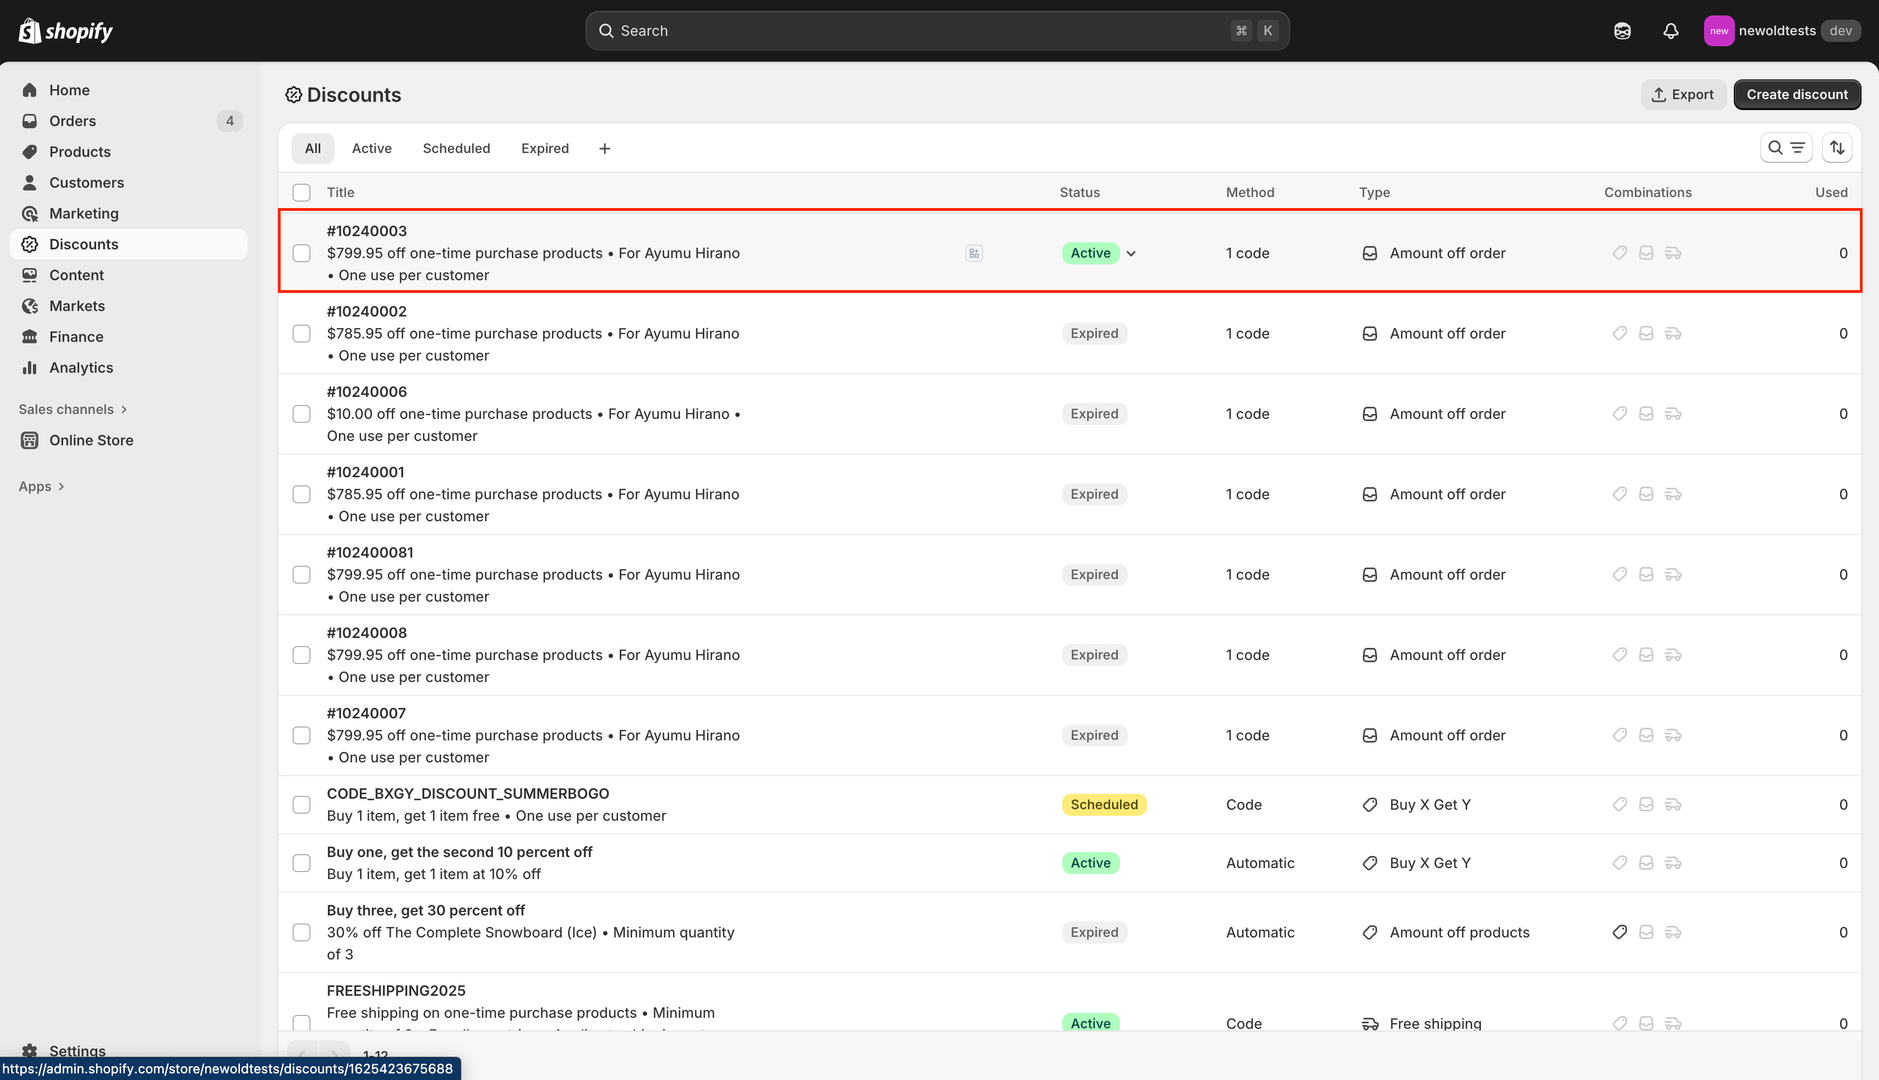
Viewing Discount Codes in Shopify
All discount codes generated through Returndotai are visible in your Shopify admin.
- 1Go to Shopify admin
- 2Navigate to Discounts section
- 3View all discount codes
- 4Find codes with your configured prefix
- 5Click on a code to see details:
- 6Code value
- 7Usage status (used/unused)
- 8Customer association
- 9Expiration date
- 10Usage limits
- 11Track redemption rates
How Customers Use Discount Codes
Receiving the Discount Code
After the merchant issues the discount code, customers automatically receive an email with the code and usage instructions.
- 1Customer receives email notification
- 2Email contains unique discount code
- 3Shows discount value
- 4Includes instructions on how to apply
- 5Displays expiration date (if applicable)
- 6Contains link to shop
Applying Discount Code at Checkout
Shoppers can use this code to get a discount on their next order.
- 1Customer shops and adds items to cart
- 2Proceeds to checkout
- 3Finds "Discount code" or "Gift card or discount code" field
- 4Enters or pastes the discount code
- 5Clicks "Apply"
- 6Discount is applied to order total
- 7Customer completes purchase
- 8Code is marked as used in Shopify
Best Practices
Choosing Effective Prefixes
Use clear, recognizable prefixes (e.g., RETURN, REFUND, EXCHANGE)
- Keep prefixes short (5-8 characters) for easy typing
- Make prefixes brand-specific to prevent confusion
- Use consistent prefixes across all discount code types
- Avoid special characters that are hard to type
Setting Discount Values
Percentage discounts (e.g., 10%) are simpler for customers to understand
- Fixed amounts work better for standardized refunds
- Consider offering slightly less than full refund to cover processing
- Test different values to find what drives best conversion
- Communicate discount value clearly in the portal and emails
Expiration Strategy
Set reasonable expiration dates (30-90 days recommended)
- Shorter expirations create urgency (30 days)
- Longer expirations improve customer satisfaction (90 days)
- Clearly communicate expiration in email notifications
- Send reminder emails before codes expire
- Check local laws regarding discount code expiration
Email Optimization
Ensure sender email is verified to prevent spam filtering
- Include clear subject lines: "Your $X Discount Code is Ready!"
- Make the discount code prominent and easy to copy
- Add a "Copy Code" button in the email
- Include step-by-step instructions on how to redeem
- Link directly to popular product categories
Troubleshooting
Common Issues and Solutions
Key points to understand:
- Code not generating: Check Shopify app permissions and connection
- Email not received: Verify sender info and email template is enabled
- Code not working: Ensure code is active in Shopify and not expired
- Wrong discount amount: Review percentage/fixed amount settings
- Customer can't apply code: Check if code has usage limits or restrictions
- Code already used: Verify single-use vs. multi-use configuration
Shopify Permissions
If discount codes are not being generated, verify that Returndotai has the necessary Shopify permissions.
- 1Check that Returndotai app is connected to Shopify
- 2Ensure app has "Write discounts" permission
- 3Ensure app has "Read discounts" permission
- 4Update permissions if needed
- 5Reconnect app if permission issues persist
Testing Discount Codes
Before going live, test the discount code workflow to ensure everything works correctly.
- 1Create a test return request
- 2Select "Refund to Discount Code" option
- 3Approve the request and issue discount code
- 4Check if code appears in Shopify admin
- 5Verify email notification is sent
- 6Test applying the code at checkout
- 7Confirm discount amount is correct
- 8Verify code is marked as used after purchase
Key Features
Revenue Retention
Keep customers shopping in your store instead of issuing cash refunds
Auto-Generation
Discount codes are automatically created in Shopify when issued
Flexible Configuration
Set custom prefixes, values, and expiration dates
Email Notifications
Customers automatically receive discount codes via email
Shopify Integration
Fully integrated with Shopify discount system
Easy Redemption
Simple checkout application process for customers
Important Notes
Discount Calculation Example
For example, a customer returns 1 order worth $100. The seller setup discount value is 10%. When the seller issues this discount, 1 discount code will be generated with a value of $10 (10% of $100).
Email Verification Required
Merchants need to verify their email by checking the "Sender info" tab in Notifications before discount codes can be sent to customers. Without verification, customers will not receive their codes.
Enable Notification Templates
Make sure to enable the "Discount code refund" notification template in Settings > Notifications so customers automatically receive their codes after you issue them.
Auto-Generation in Shopify
After clicking "Submit", the discount code will be auto-generated in your Shopify admin. You can view and manage all codes in Shopify > Discounts.
Choose Clear Prefixes
Use clear, memorable prefixes for your discount codes (e.g., RETURN, REFUND) to make them easy for customers to recognize and type at checkout.
Test Before Launch
Create a test return and issue a discount code to verify the entire workflow works correctly before enabling this feature for all customers.
Related Articles
How to resend notification in management details
Manually resend email notifications to customers from the order management detail page
How return notifications are sent
Understand the email notification flow for return and exchange requests
How to manage return request with pagination
Efficiently browse and filter return requests using pagination controls
How to prevent return request from specific date range
Set order date range policies to restrict returns during specific periods